Blender tutorial: PBR material for brick wall
In this fourth tutorial of the mini-course in english for Blender "Blender course: from photo to 3D wall", we will see how to create a PBR material for the wall we are making, using the maps we had previously saved.
A PBR (Physically Based Rendering) material is a material that should take into account the physical characteristics of the object, but we are in the world of artistic representation so we will use "shaders", components that simulate shadows and shades, approximating what happens on it when it is hit by a ray of light in reality.
In particular we will use the shader represented by the "Principled BSDF" node, called "Principled" because it does not approximate physics in a rigorous way, but follows the principles (a few intuitive parameters that lead to a plausible result, rather than physical parameters) initially formulated by Disney who first formalized this model, and "BSDF" (distribution function of bidirectional scattering) because, starting from an incident light beam, both the distribution of all the reflected rays and that of all those transmitted inside of the material are calculated .
In the previous tutorials we had built the approximate shape of the bricks using two methods, the one with the displace modifier ("Blender: bricks with the displace modifier") and the one with the adaptive subdivision ("Blender: bricks with adaptive subdivision/microdisplacement"), saving the results in the two files "displacemodifier.blend" and "adaptive_subdivision_microdisplacement.blend".
In this tutorial we will use the maps created with Krita in this tutorial "Krita tutorial: how to create displacement, height, normal maps", but textures downloaded from the Internet or created with other programs can also work (we'll talk about these later, at the bottom of the page at the end of this tutorial)
PBR bricks material with displace modifier, "base color":
We load the file "displacemodifier.blend"

let's disable the "Displace" modifier for now,

and select the "Shading" workspace

In the "Shader Editor" below, if it is not present, create the node for the texture (Add > Texture > Image Texture), load the "diffuse_map.jpg" texture representing the initial photo of the wall and connect the "Image Texture" node to the "Principled" node (for the moment we leave the default settings of the "Principled" node unchanged) in the "base color" port to indicate that this texture is used to give the base color to the object associated with the material

connect to the "Image Texture" node the "Texture Coordinate" node (Add > Input > Texture Coordinate), which unequivocally defines the type of mapping used, and the "Mapping" node (Add > Vector > Mapping) which in this tutorial it is not needed, but it is always useful to resize the texture in certain situations (we will use it in another lesson to resize/rotate a writing on the wall).

In the preview we now see

as input for the "base color" port we used an unprocessed photo, if we had instead transformed it into an "albedo" texture before we would have had to mix it (using an Add > Color > MixRGB node) with its "Ambient Occlusion" map (AO) additional, which forces the presence of shadows by calculating where the volumes stop the rays of light

modifying the "Fac" factor according to the characteristics of the "albedo" image, the original photo from which the map was taken and the result to be obtained.
Downstream of the texture we can possibly add a "Hue/Saturation" node (Add > Color > Hue/Saturation) or a "RGB Curves" (Add > Color > RGB Curves)

if there is a need to add or remove contrast to the image, or to make the bricks less red

these modifiers can be used directly or so that the final result is mixed, through the MixRGB node (Add > Color > MixRGB)

in the "Image Texture" node, for the images to be displayed on a monitor, in "Color Space" you must always set the sRGB option, which is the RGB encoded color space optimized for display (therefore used for monitors), in fact a texture contains information that a human eye cannot see, a conversion is then performed so that the colors and shades of gray are displayed at their best.
Height map and normal map in the PBR material:
With the "Displace" modifier we have roughly defined the shape of the bricks, now with the height map and normal map we will add details, such as brick scratches or porosity.
Let's change some settings: in the "Render properties" we set a number of samples 150 for "Viewport" (for Blender from version 3.0 we set this value in "Max Samples")

and disconnect the textures from the "base color" door.
To add details to the bricks we use the two maps we created with Krita: "normal_map.jpg" and "height_map.jpg".
For these maps and for the others that we will see later, the "Color Space" color space must be set as "Non-Color" as the data must be read from the map as it is, any conversion to sRGB would change instead to incorrectly the information contained therein.
To read the data from the map and create the perturbation in the normals, which will add "virtual" details (locally modifying the ways in which the shadows are created when the object is hit by the light), we use the "Normal Map" node ( Add > Vector > Normal Map) which, as we can see, receives the colors of the map as input (through the "color" port) and returns the "vectors" at the output (through the "normal" port)

In the "Normal Map" node there are three parameters to set: in the drop-down menu you specify the type of normal map we are using ("Tangent Space", "Object Space", "World Space", "Blender Object Space", " Blender World Space ")

we choose "Tangent Space", because in Krita we had built a normal map of tangent space.
We must then choose the UVMap to use, usually it is that of the object on which the map must be applied, in our case there is only one that is "UVMap", that of our plan, created and configured previously by the addon "Images as Planes" with which we had imported the photo of the wall.

the last parameter, "Strength", indicates how noticeable the effect of the normal map will be. If we set for example Strength:3 value we will have as a result

with only an apparent deformation of the mesh, made using lights and shadows, in fact if we look at the plane from the side, we will notice that no relief has been created, unlike what happened with the "Displace" modifier.

To add the details to the bricks we can use a normal map or the "height_map.jpg" (to be added with Color Space:"Non-Color"), which we had created in the other tutorial for Krita, placing a Bump node downstream (Add > Vector > Bump), or we can combine the effects of the two maps together, concatenating the nodes

The Bump node is regulated by three parameters: an "Invert" option that allows you to reverse the interpretation of the map heights, "Strength" that determines the strength of the maps effect (in practice, visually, it colors more clearly or more dark shadows), "Distance" a multiplier of the input height value to control the distance we want to simulate.
We also connect the height map and normal map nodes to the "Mapping" node

in the preview of the "Shading" workspace we see, with the "Strength" values set in the previous images, that the reliefs of the bricks are more defined

you can vary the parameters according to the type of material, the distance from the object, the effect you want to obtain
Roughness map in PBR material:
The "Roughness" parameter is used to indicate the roughness of the object, which can be dusty or porous, fragmenting and reflecting the ray of light that hits it in multiple parts.
With the normal map (with Strength:0.6) and the height map connected to the "Principled" node, through the "Bump" node the effect of a roughness map will be not very evident, as the normal map already influences lights and shadows on the object.

however, if we disconnect the "Bump" node from the "Principled" node, a reflection of the sun will appear hitting the brick from above.

Now let's see how to manage this reflection: in the "Principled" node the "Specular" parameter is set to 0.5, we leave this value unchanged as the material is dielectric, while the "Roughness" parameter is set to 0.5 by default.

Now let's add the map "roughness_map.jpg", created in the other tutorial for Krita together with the other maps, using the "Image Texture" node (Add > Texture > Image Texture), also here with "Color Space:Non-Color" because it is a map that must be read without filters and modifications,

and we will already see an improvement, with a reflection above the brick that takes into account the light coming from above, but more diffused than before

We can optionally put a "ColorRamp" node (Add > Converter > ColorRamp) to decrease the influence of roughness by the texture, thus increasing the concentration of reflections


or to increase the roughness


Considering also the fact that we have to reinsert the bump/normal maps, we choose the values that will allow us to achieve a good result for our project.
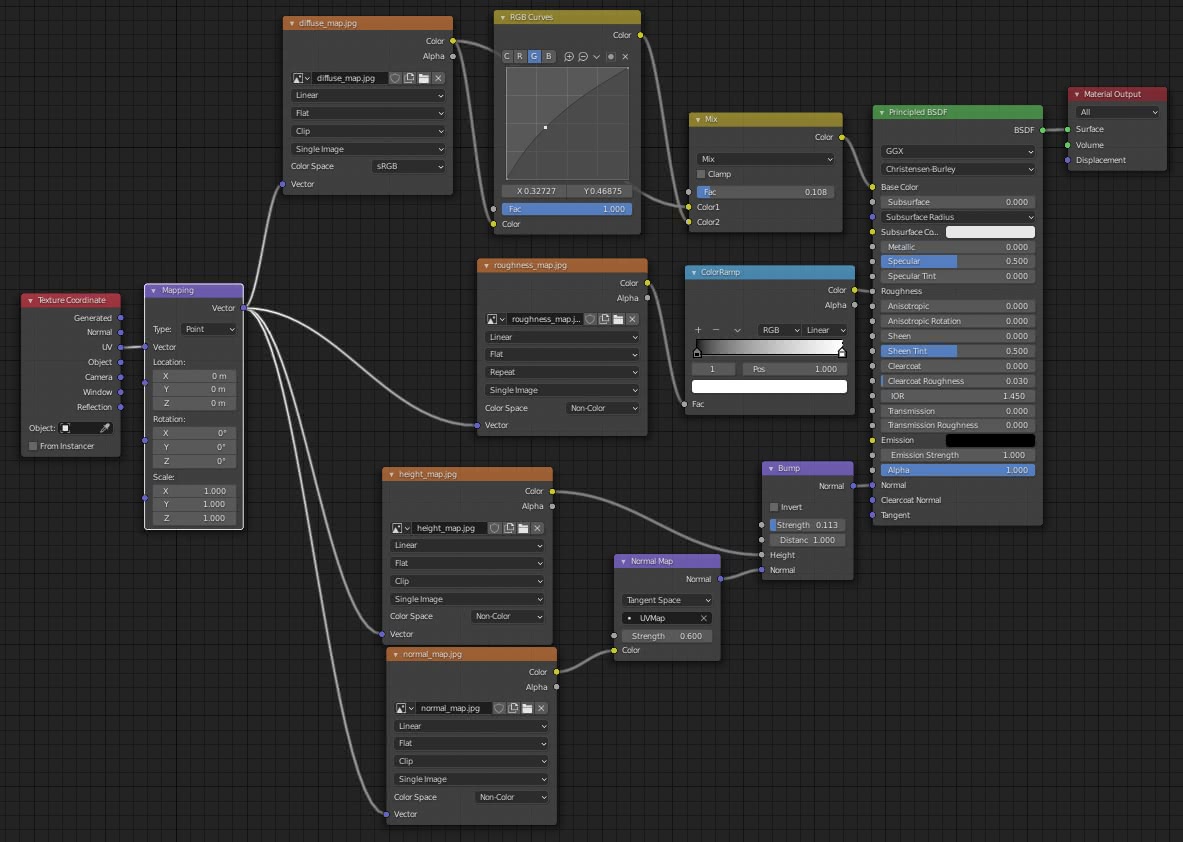
With this roughness map we have finished the tutorial of the basic PBR material for the wall bricks. Below you can click the image to see the entire node diagram created.
With the displace modifier
Here is the example after following the tutorial on adaptive subdivision

You can download the project files here:
diffuse_map.jpg
displacement_map.jpg
height_map.jpg
normal_map.jpg
roughness_map.jpg
blender_wall_pbr_material_adaptive_subdivision.blend
blender_wall_pbr_material_displace_modificator.blend
world hdri
Let's now see some suggestions on how to speed up the creation of nodes, make settings and debug.
How to speed up the work:
In the tutorial we created the nodes containing the maps using the appropriate menu function (Add > Texture > Image Texture), but we can speed up the process by dragging the textures or from the "file browser" of the "Shading" workspace

or from the file browser of our operating system.

The "Image Texture" node will be created automatically, just select "Color Space: Non-Color" or "Color Space:sRGB" and connect it to the others.
The Node Wrangler add-on:
An addon that can help us in managing nodes is undoubtedly "Node Wrangler", already supplied by default to Blender. We can activate it in "Edit > Preferences" by selecting the "Add-ons" tab

This addon is important as it provides useful functions that allow you to speed up your work in fact, for example, by selecting a "Principled" node, pressing the "Ctrl+Shift+t" keys, selecting the various maps with the "File Browser", automatically load and link "diffuse", "normal map", "roughness map" etc.

or by pressing the "Ctrl+Shift" keys and clicking with the left mouse button on a texture, we can see a preview of it (useful to understand how to change the settings of some maps of our PBR material)

For more features, see the "Guide to Node Wrangler addon for Blender and pdf shortcuts"
How to create maps/textures:
We saw in one of the previous tutorials how to create maps with Krita and in a similar way we can build them with other generalist 2D graphics software, such as GIMP or Photoshop.
However, there are also dedicated software, such as Materialize (open source), or Crazybump, but also online services such as NormalMap-Online, where it is enough to load the diffuse texture to automatically obtain all the other maps.
Where to download the maps/textures:
If for some reason you cannot build your textures from a photo, you can download them from some dedicated sites. For example at ambientcg.com, polyhaven.com, sharetextures.com, cgbookcase.com, 3dtextures.me are available free packages that contain various maps to represent various materials such as walls, floors, tree bark and much more. Generally, in each package there are several files: a color texture that can appear with various names ("color", "basecolor", "diffuse" etc.), a map for ambient occlusion (sometimes indicated with AO), a map for displacement (which can be referred to as "displacement" or "height"), one or more normal maps, a map for roughness and, sometimes, a specular map.
In some cases files in usd format may also be made available, while Polyhaven.com also provides the relative files in .blend and .gltf format to simplify certain operations.
Sometimes more textures are provided representing normal maps as they have been encoded according to two different standards, DirectX and OpenGL, and the names of the related files have words like "normaldirectx" and "normalopengl", or more briefly "normaldx" and "normalgl" which identify the respective format. These two maps differ in that the green channel of the RGB map with which they have been encoded has the bit inverted with respect to each other. Consequently, observing them we notice that the relief parts of one appear sunken in the other and, vice versa, its sunken parts appear in relief in the second map, similar to when we had created the normal map with Krita in one of the previous tutorials, where we had to choose Y- al place of Y+ to see which direction to interpret the vectors for lights and shadows.
Therefore, in the event that the normal map, downloaded from a site, gives an undesirable result

we will need to add an "RGB Curves" node (Add > Color > RGB Curves) to invert the "Green" channel

thus obtaining

For this tutorial on how to make a PBR material for a brick wall that's all. In the next we will see how to add imperfections such as damp spots (Blender tutorial: how to add dirt to a wall) and writing. Happy blending!
Back to "Blender course: from photo to 3D wall" course