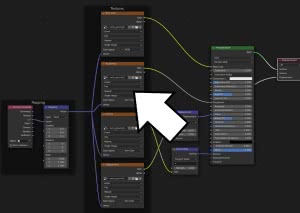
Guide to Node Wrangler addon for Blender and pdf shortcuts
In this tutorial in english for Blender the main functions of the "Node Wrangler" addon are presented, with the relative shortcuts (of which you can download a list in pdf at the end of the page). For this guide we used Blender 3.1 and Node Wrangler 3.38, but the concepts illustrated are also valid for the other versions, with a few differences.
The Node Wrangler addon helps speed up many actions within the Shader Editor, now also in the editor for Geometry Nodes, adding some from the Compositor and others that can simplify some operations. It allows you to automatically add sets of textures and maps, instantly combine shaders and textures with "Mix" nodes, create quick previews of each element present, manage and order the nodes present and much more.
At times we have presented some alternatives for hotkeys, because not all keyboards are the same and because there may not be a direct correspondence between the position and name of the various keys, as stated in the add-on documentation. So depending on the keyboard you have, when you encounter problems you experiment (as we did) by pressing the various keys until you find the right ones, keeping the image of an american international keyboard under your eyes.
We indicate with:
LMB = left mouse button
RMB = right mouse button
Drag = after pressing the keys, drag the mouse
How to enable Node Wrangler in Blender:
After starting Blender, to test this addon we position ourselves in the "Shader Editor", using the drop-down menu of the windows, or by pressing the "Shift+F3" keys, or using the "Shading" workspace.

"Node Wrangler" is already present in the Blender software you downloaded, so just activate it: in the main menu select "Edit > Preferences" and in the preferences window click on the "Add-ons" tab, look for the "Node Wrangler" addon and we activate it by checking the "Node: Node Wrangler" option.

As you can see, in the add-on tab there are various options and settings, for example by clicking on "Show Hotkey List" we can bring up the complete list of Node Wrangler hotkeys
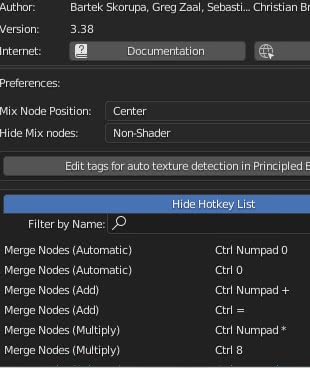
however we will consider only a part of it, both because some functions have been replaced by the standard ones of Blender in the latest versions, and because sometimes they may not be available due to the keyboard used, and because there may be conflicts with other shortcuts.
To view the Node Wrangler functions, we can place the mouse cursor on the "Shader Editor" window and press "Shift+w"

or, still in the "Shader Editor" press the "N" key to bring up the panel on the right, then click on the "Node Wrangler" tab

Now let's see the interesting functions provided by this add-on, which we have grouped into the most important categories here
How to add textures:
How to create the nodes of maps and textures automatically: [Ctrl+Shift+t]
When you want to create a PBR (physically based rendering) material, you have to connect to the "Principled" shader many textures representing the maps, with the relative "Mapping" and "Texture Coordinate" node. Node Wrangler helps us in this situation by speeding up the work.
In the "Shader Editor" select the "Principled" node and press the "Ctrl+Shift+t" keys; the "Blender File View" window will appear with which we can select the textures representing the maps (in our case color, height, roughness and normal map), previously created or downloaded from some site.
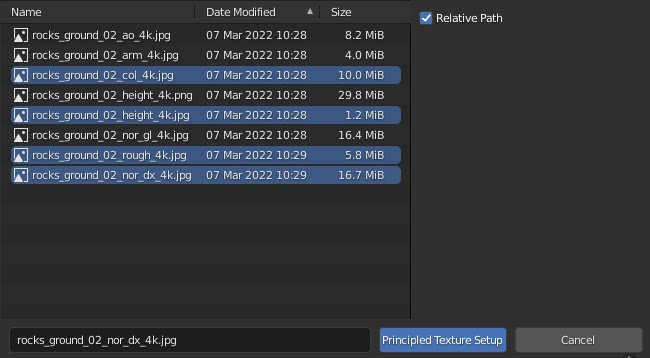
Click on the "Principled Texture Setup" button at the bottom right and in the "Shading Editor" the textures nodes will automatically appear, connected to the "Principled" node, with the relative "Mapping" and "Texture Coordinate" nodes.
The texture representing the image will be correctly connected to the "Base Color" port of the "Principled" node, the texture representing the roughness has been correctly connected to the "Roughness" port, the texture representing the normal map has been connected to the port "Normal" through the "Normal Map" node and the texture indicating the height has been connected through the "Displacement" node to the "Displacement" port of the "Material Output" node.
All this was made possible by the "Node Wrangler" node which, reading the names of the imported files, was able to interpret the various images, placing them in the right position. In fact, if we look again at the add-on tab in the preferences, by clicking on the "Edit tags for auto texture detection in Principled BSDF setup" button, the various fields will appear in which we can enter all the possible words, contained within the files, which can identify various types of maps
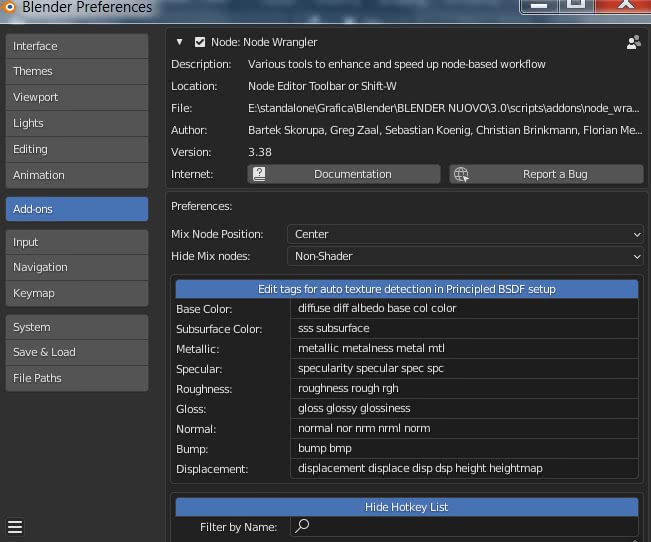
if we want to provide specific names, just add the related tags to the addon lists.
How to add configuration and scaling to a texture, or add textures and configuration to a shader: [Ctrl+t]
When a shader needs a texture, you must also add a node that defines its size and a node that specifies the mapping coordinates, a rather tedious job that wastes time. To overcome this problem, thanks to Node Wrangler just select the shader

and press the "Ctrl+t" keys, the "Image Texture" nodes (where we can load the texture), "Mapping" and "Texture Coordinate" (of which the "UV" port is connected, using UV coordinates for the texture) will automatically appear

This system works "in sequence": if the "Image Texture" node is already present, if we select it and press the "Ctrl+t" keys, the "Mapping" and "Texture Coordinate" nodes will appear, if the node is also present "Mapping", if we select it and press the "Ctrl+t" keys, only the "Texture Coordinate" node will appear.
This function is activated even if we select a "MixRGB" node

or any function that modifies a texture, such as "Bright/Contrast"

Similarly, the "Mapping" and "Texture Coordinates" nodes will appear in correspondence with other types of textures, such as "Brick Texture".
If, on the other hand, we work on the "World" material, selecting "Background" and pressing "Ctrl+t" the "Environment Texture" node will appear, with the "Mapping" and "Texture Coordinate" nodes.

How to refresh the images present: [Alt+r]
Once the textures have been loaded with the above methods, if we modify the images in an external 2D graphics editor, we could update all the textures present by pressing the "Alt+r" keys.
Still as regards textures, Node Wrangler adds two new items to the menus "Add > Input" (in the Compositor) and "Add > Texture" (in the "Shader Editor"):
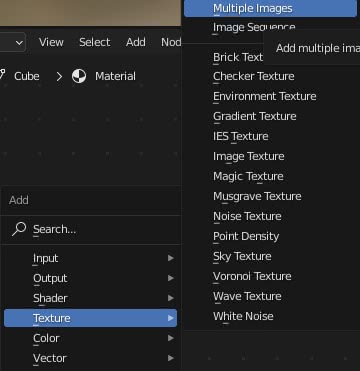
"Add Multiple Images":
As we have seen before, there may be a need to insert many images. By activating this function with "Add > Texture > Multiple Images", the "Blender File View" window appears; in this window, selecting the first image while holding down the "Shift" key, click on the last one, thus selecting a list of files.
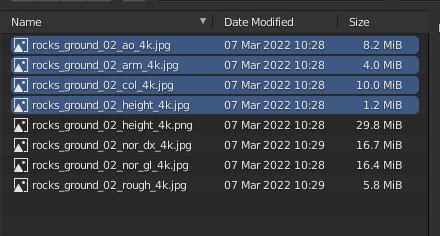
clicking on the "Open Selected Images" button will automatically create the nodes of all the selected images, which we can use in various ways
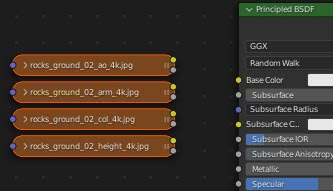
(to expand each node just click on the left arrow ">")
"Add Image Sequence":
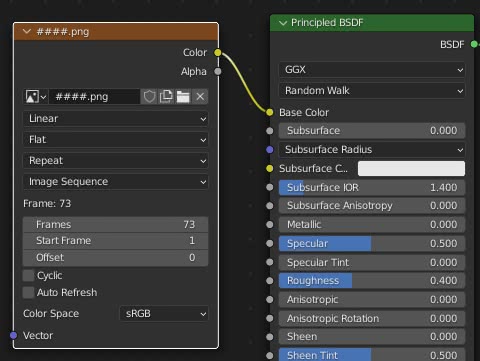
If we want a video consisting of a sequence of images to be displayed on an object (for example a texture that changes with time, or a television broadcast on a television during an animation), selecting from the menu "Add > Texture > Image Sequence", the "Blender File View" window. If we select the first file of a video sequence and press the "Import Image Sequence" button
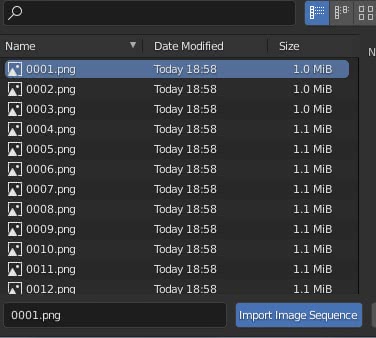
a node will appear with the number of frames already calculated, which you just need to connect to the relative shader
How to see previews and results:
How to preview a shader or texture with Node Wrangler: [Ctrl+Shift+LMB]
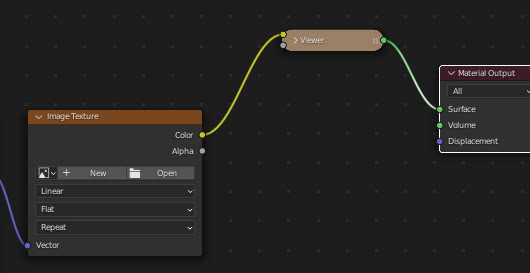
By holding down the Ctrl+Shift keys and clicking with the left mouse button on the node you want to see the preview, if the node represents a shader this will be connected directly to the "Material Output", if it is a texture or (for example ) a "MixRGB" node will create a "Viewer" node between the selected node and the "Material Output"

Although it is similar to the Compositor's "Viewer" node, it actually functions as an emission node so that there is no shading on the object and the texture is seen so clearly.
If we press several times with the Ctrl+Shift+LMB keys on a node, the other ports are also connected to the "Viewer" node; for example in an "Image Texture", in addition to "Color", the second click will also show the "Alpha" port ( useful function to also display the mask, generated by the texture, used to blend nodes).
How to connect directly to the Output: ["O"]
To connect a shader directly to the "Material Output" (or to the "Composite" node in the Compositor), just select the relevant node and press the key representing the letter "O" on the alphanumeric keyboard.
If we are considering a node representing a texture, this will be connected to the "displacement" port of the "Material Output".
How to add Mix Shader, MixRGB and Math nodes automatically:
When the structure of a material becomes too complex, to act on the single node you have to continuously move the pattern, with multiple and tedious zoom in and zoom out when you want to join the various shaders and textures. To overcome this drawback with Node Wrangler you can use two methods: the "lazy mix" or the automatic creation of a "Mix" node (or other).
How to join two shaders or two textures by dragging the mouse (Lazy Mix): [Ctrl+Shift+RMB and Drag]
If we need to combine two textures, we press the "Ctrl+Shift" keys and, holding them down, click with the right mouse button on one of the textures then, holding the button down, drag the mouse towards the second texture. This will form a temporary link green color
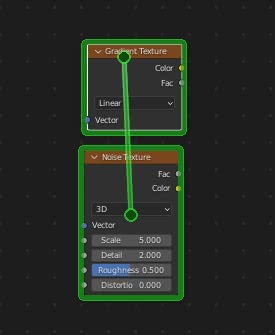
Releasing the mouse button will automatically create a "Mix RGB" node.

If we connect two shaders instead
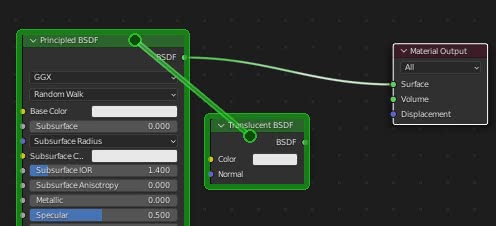
a "Mix Shader" node will be created.
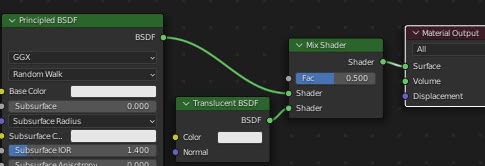
If one of the two textures is already linked to a shader
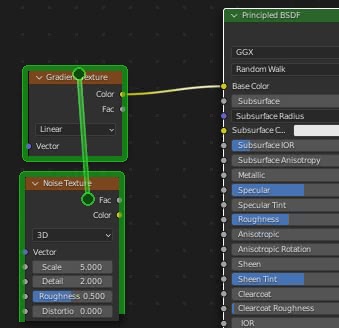
the resulting "Mix" node will also connect to that shader

Likewise in the case of two shaders, a "Mix shader" node will be created which will be linked to where one of the two shaders was previously joined, the choice on which output to point to could be determined by the position of the two shaders.
In this example, in fact, the "Transparent" node is lower than the "Principled" node and if we connect them

the created "Mix Shader" will connect to the one to which the "Principled" node was previously tied,

while if the "Transparent" node had been higher
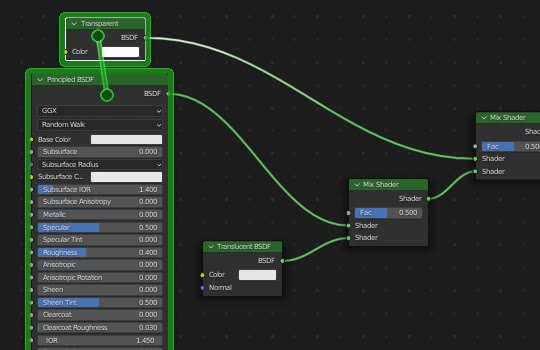
the resulting "Mix Shader" node would be connected to the one previously linked to the "Transparent" node

In addition to "Lazy Mix" we now see another method to generate a node that mixes textures or shaders, but in this case Node Wrangler can cause some confusion in the user because it offers both a set of shortcuts to perform this operation in a general way, automatically recognizing the nodes to join, both a set of hotkeys that force the creation of a "MixRGB" node, and a set of shortcuts that force the creation of a "Math" node.
Several variations of the shortcuts for each function are presented here, both because a keyboard may not have a numeric keypad, and because there may be correspondences and incompatibilities between the international keyboard and other keyboards.
General node fusion, with automatic type detection:
If you select two nodes (or by clicking while holding the "Shift" key pressed or, for example, with the rectangular selection by pressing the "Ctrl+b" keys) it is possible to create a node that joins them and mixes their effects in various ways; by pressing the following keys the Node Wrangler add-on will automatically recognize the types of nodes (shaders, textures, nodes for mathematical calculations) and depending on availability, which can change from type to type (only nodes are compatible for shaders "Mix Shader" and "Add Shader"), will assign the most appropriate blend node.
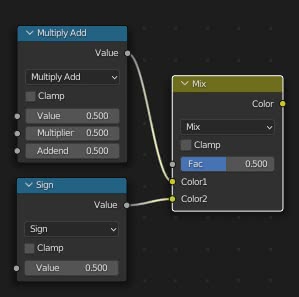
As an example we consider three pairs of nodes: two shaders ("Diffuse BSDF" and "Glass BSDF"), two texture nodes ("Checker Texture" and "Brick texture") and two Math nodes that you can find by switching the selection in the drop-down menu in the node "Add > Converter > Math" ("Multiply Add" and "Sign").
How to add a Mix node: [Ctrl+"0"]
If we select the two nodes and press the keys Ctrl+"0" on the numeric keypad, or Ctrl+"0" on the alphanumeric keyboard, a "Mix Shader" node will be created to join the two shaders, a "MixRGB" node (with "Mix "selected) to mix the two nodes representing the textures
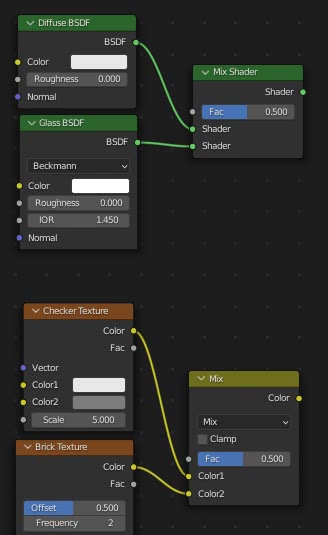
and creates a "MixRGB" node also for two "Math" nodes, which can be used but is not entirely semantically correct
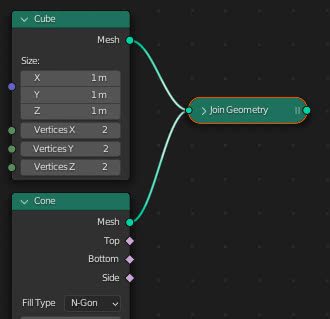
In the "Geometry Nodes" editor with "Ctrl+0" a "Join Geometry" node is added instead
How to add an Add node: [Ctrl+"+"]
If we select the two nodes and press the keys Ctrl+"+" on the numeric keypad, or Ctrl+"+" on the alphanumeric keyboard, an "Add Shader" node will be created to join the two shaders, a "MixRGB" node (with "Add "selected) to mix the two nodes representing the textures and a" Math "node (with the" Add "option selected, in the" Add > Converter > Math" node) to connect two nodes of the "Math" type

How to add a Multiply node: [Ctrl+"*" (or Ctrl+"8")]
If we select the two nodes and press the keys Ctrl+"*" on the numeric keypad, or Ctrl+"8" on the alphanumeric keyboard, no other specific correct nodes will be created to join the two shaders, as there are only nodes to mix the shaders "Mix Shader" and "Add Shader". While for textures a "MixRGB" node will be created with "Multiply" option selected, while for "Math" nodes a "Math" node with "Multiply" option selected
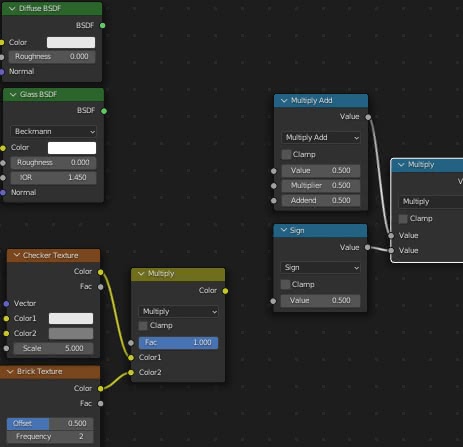
the same goes for the "Subtract" and "Divide" nodes
How to add a Subtract node: [Ctrl+"-"]
If we select the two nodes and press the keys Ctrl+"-" on the numeric keypad, or Ctrl+"-" on the alphanumeric keyboard, a "MixRGB" node will be created for the textures with the "Subtract" option selected, while for the nodes "Math" a "Math" node with "Subtract" option selected.
How to add a Divide node: [Ctrl+"/" (or Ctrl+"ù")]
If we select the two nodes and press the keys Ctrl+"/" on the numeric keypad, Ctrl+"/" or Ctrl+"ù" (depends on the keyboard layout) on the alphanumeric keyboard, a "MixRGB" node will be created for the textures with "Divide" option selected, while for "Math" nodes a "Math" node with "Divide" option selected.
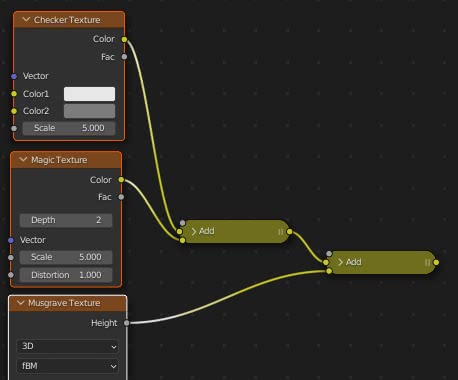
Mixing nodes can also be added by selecting more than 2 nodes at the same time: if we select three textures nodes and press the Ctrl+"+" keys, two "MixRGB" nodes will appear, with Add selected, in cascade.
Fusion of nodes by forcing the use of the MixRGB node:
With this group of hotkeys it is possible to force the use of a "MixRGB" node with its variants to mix nodes of various types, even when this is not very correct semantically or syntactically.
For example, if we select two nodes and press the Ctrl+Alt+"+" keys, the "MixRGB" node will appear with the "Add" option selected whether we are considering shaders, textures or "Math" nodes.

These are the main shortcuts of Node Wrangler to create the various "MixRGB" nodes:
How to create a MixRGB node with "Add" option selected: [Ctrl+Alt+"+" (or Ctrl+Alt+"=")]
After selecting the nodes, if you have the numeric keypad you can press the keys Ctrl+Alt+"+"; otherwise in the alphanumeric keyboard you can press the keys Ctrl+Alt+"=", or Ctrl+Alt+"+" depending on the keyboard layout.
How to create a MixRGB node with "Subtract" option: [Ctrl+Alt+"-"]
After selecting the nodes, if you have the numeric keypad you can press the keys Ctrl+Alt+"-", as well as in the alphanumeric keyboard you can use the key combination Ctrl+Alt+"-".
How to create a MixRGB node with "Multiply" option: [Ctrl+Alt+"*" (or Ctrl+Alt+"8")]
After selecting the nodes, if you have the numeric keypad you can press the keys Ctrl+Alt+"*"; otherwise in the alphanumeric keyboard you can press the keys Ctrl+Alt+"8".
How to create a MixRGB node with "Divide" option: [Ctrl+Alt+"/" (or Ctrl+Alt+"ù")]
After selecting the nodes, if you have the numeric keypad you can press the keys Ctrl+Alt+"/"; otherwise in the alphanumeric keyboard you can press the keys Ctrl+Alt+"/", or Ctrl+Alt+"ù" depending on the keyboard layout.
Merge nodes by forcing the use of the Math node:
With this group of hotkeys it is possible to force the creation of a "Math" node, with its variants, to mix nodes of various types, even when this is not very correct semantically or syntactically.
For example, if we select two nodes and press the Ctrl+Shift+"+" keys, a "Math" node with an "Add" option selected will appear whether we are considering shaders, textures or "Math" nodes.

These are Node Wrangler's main shortcuts for creating the various "Math" nodes:
How to create a Math node with "Add" option selected: [Ctrl+Shift+"+" (or Ctrl+Shift+"=")]
After selecting the nodes, if you have the numeric keypad you can press the Ctrl+Shift+"+" keys; otherwise in the alphanumeric keyboard you can press the keys Ctrl+Shift+"=", or Ctrl+Shift+"+" depending on the keyboard layout.
How to create a Math node with "Subtract" option: [Ctrl+Shift+"-"]
After selecting the nodes, if you have the numeric keypad you can press the keys Ctrl+Shift+"-", as well as in the alphanumeric keyboard you can use the key combination Ctrl+Shift+"-".
How to create a Math node with "Multiply" option: [Ctrl+Shift+"*" (or Ctrl+Shift+"8")]
After selecting the nodes, if you have the numeric keypad you can press the keys Ctrl+Shift+"*", otherwise in the alphanumeric keyboard you can press the keys Ctrl+Shift+"8".
How to create a node with "Divide" option: [Ctrl+Shift+"/" (or Ctrl+Shift+"ù")]
After selecting the nodes, if you have the numeric keypad you can press the Ctrl+Shift+"/" keys; otherwise in the alphanumeric keyboard you can press the keys Ctrl+Shift+"/", or Ctrl+Shift+"ù" depending on the keyboard layout.
How to create "Less Than" [Ctrl+Shift+"," (or Ctrl+",")] and "Greater Than" [Ctrl+Shift+"." (or Ctrl+".")]
Slightly different the combination of the keys for the "Math" "Less Than" and "Greater than" nodes, which are used to create low-pass and high-pass numerical filters also on the values of a map, which can be activated on the numeric keyboard with the keys Ctrl+Shift+"," and Ctrl+Shift+"." or on some keyboards with Ctrl+"," and Ctrl+"." .
In the Blender compositor we can then create two other interesting nodes, using other hotkeys:
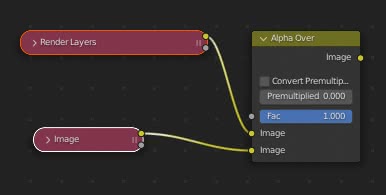
How to create an "Alpha Over" node: [Ctrl+Alt+"0"]
In the compositor, if you have the numeric keypad available, you can press the keys Ctrl+Alt+"0", also in the alphanumeric keyboard you can press the keys Ctrl+Alt+"0", and an "Alpha Over" node will be created (which can be used to superimpose two images on top of each other, for example a rendering on a background image)
How to create a "Z-Combine" node: [Ctrl+"."]
In the compositor only if you have the numeric keypad you can press the Ctrl+"." keys and create a Z-Combine node which, as the name implies, can combine two images based on their Z depth maps.

The fusion nodes can be added in cascade by activating the same command several times. For example by selecting two "Math" nodes and pressing the Ctrl+* keys several times

We have seen how to create a node to mix shaders and textures, now we see the hotkeys to modify its parameters.
How to change operations and blending mode:
In a "MixRGB" node we can select the blending mode from the drop-down menu ("Blending Mode")

while in a "Math" node we can select the type of operation (function, comparison, rounding, trigonometry, conversion)

also in this case Node Wrangler provides shortcuts to speed up operations:
Alt+up/down arrow: you can select the previous or next operation/blending mode.
Alt+"0" in the numeric keypad, or Alt+"0" in the alphanumeric keyboard: select "Mix" in the "MixRGB" node
Alt+"*" (in the numeric keypad), or Alt+8 in the alphanumeric keyboard: select "Multiply" in the "Math" and "MixRGB" nodes
Alt+"/" (in the numeric keypad), or Alt+"/" (or Alt+"ù") in the alphanumeric keyboard: select "Divide"
Alt+"+" (in the numeric keypad), or Alt+"=" (or Alt+"+") in the alphanumeric keyboard: select "Add"
Alt+"-" (in the numeric keypad), or Alt+"-" in the alphanumeric keyboard: select "Subtract"
also with
Alt+"," or Alt+"<", in the alphanumeric keyboard, select "Less Than"
Alt+"." o Alt+">", in the alphanumeric keyboard, select "Greater Than"
Backspace: resets the node, selecting the first element in the list, the one that appears when the node is created for the first time from the menu. So when you press the key after selecting a "MixRGB" node, "Mix" will be selected, while in a "Math" node "Add" will be selected
How to change Factor (Fac) in "MixRGB" and "Mix Shader":
In the "MixRGB" and "Mix Shader" nodes created, you can see a parameter named "Fac" (Factor) that indicates how values entered in the incoming ports of the node are mixed

To use shortcuts, once a node "Mix" (for example) has been selected, using the arrow keys that can be found on the keyboard:
Alt+right arrow increases the value "Fac" by 0.1, while Alt+left arrow decreases the value "Fac" by 0.1
Alt+Shift+right arrow increases the value "Fac" by 0.01, while Alt+Shift+left arrow decreases the value "Fac" by 0.01
Ctrl+Alt+Shift+right arrow sets the value of "Fac" to 1.0, while Ctrl+Alt+Shift+left arrow sets the value of "Fac" to 0.0
Arc/Link Operations:
How to connect two nodes by dragging (Lazy Connect): [Alt+RMB Drag]
As in the case of "Lazy Mix", which we used earlier when creating "Mix" nodes, when there are many elements one needs to zoom back and forth to add new connections to the nodes.
Using the Node Wrangler functions, if we are in the case of a large map with small figures present, to connect two nodes we position ourselves on the first, even without selecting it, press the "Alt" key and holding the right mouse button down drag from first to second node (edges and link now appear red)

However, we see that the desired ports are not always connected, in fact in our case we wanted the "Color" port of the "Image Texture" node to be connected to the "Base Color" port of the "Principled" node, while the two doors "Alpha".

We will see that you can get around the problem in two ways (which will be presented below): either by using a function that allows you to choose the ports to connect, or by moving the connection to another port through other shortcuts.
Lazy Connect with choice of ports from menu: [Shift+Alt+RMB Drag]
From an operational point of view it works like "Lazy Connect", only with a few more choices to make at the end: holding down the "Shift+Alt" keys, clicking on the first node with the right mouse button, holding it down and drag it to the target node (the edges and the bond that now form are blue).

a popup menu will immediately appear in which you can choose the port of the first node from which to start the connection (in our case the "Color" port)
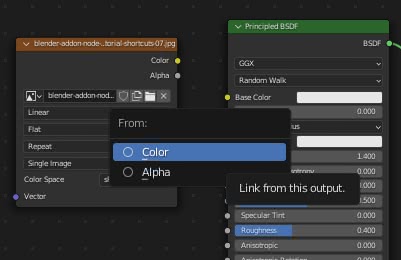
once the starting port has been chosen, another menu will appear in which to select the arrival port in the second node (in our case the "Base Color" port)

now the connection will be made correctly between the right ports
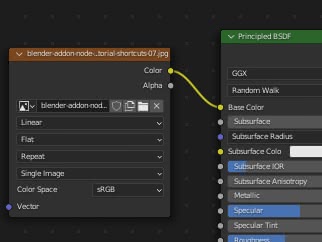
Swap links: [Alt+s]
Sometimes you may feel the need to swap the positions of the incoming connections to a node. For example if we have an "Image Texture" connected to a "Principled" node, but to the wrong port,
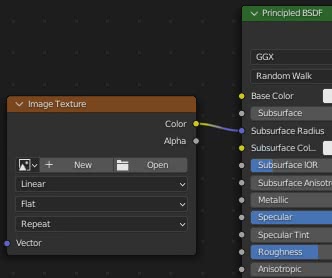
in this case you select the "Principled" node and press the "Alt+s" keys one or more times to move the link to the desired position.
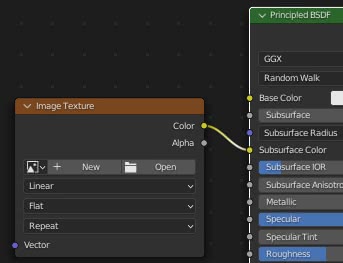
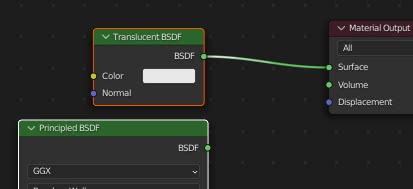
Another example: if we are testing which "shaders" to use for a material
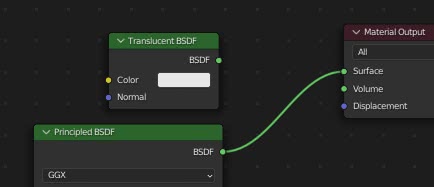
to change the connection just select the two "shaders" and press the "Alt+s" keys.
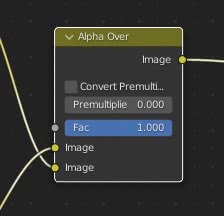
Or in the "Compositor" we linked two images to the "Alpha Over" node
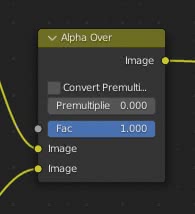
to invert the overlap select the "Alpha Over" node and press the "Alt+s" keys.
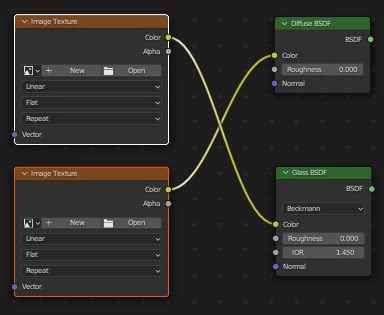
This function can also be used in the case of multiple destination nodes: if we have two shaders with two images as input

if we select the two "Image Texture" nodes and press the "Alt+s" keys, we can swap the textures at the entrance of the two shaders
Multiple connections:
Connection to multiple nodes (without replacing links): [k]
If we want to connect a node to several nodes at the same time

we select all the destination nodes and lastly, holding down the "Shift" key, the source node; then we press the "k" key.

(this function can also be used to connect only two nodes after selecting them, in this case it corresponds to the Blender function that can be activated by pressing the "f" key, thus joining the nodes in a similar way to how it is done with meshes in "Edit Mode")
It can be useful when a node provides a configuration that must affect multiple nodes at the same time, such as the "Mapping" node or the "Texture Coordinate".

However, if one of the target nodes is already connected to another node,

only free nodes are connected

To replace the links then use:
Connecting to multiple nodes (replacing links): [Shift+k]
In the case just seen, after selecting the target nodes and lastly the source node, pressing the "Shift+k "will also replace the link already connected
There are two other similar methods that, however, consider more specific situations:
Connection to multiple nodes (without replacing links) that have the same name/label as the active node: [" (or 'à')]
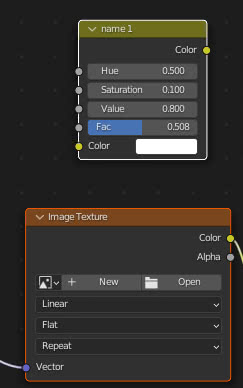
If (just to give an example) there is a "Diffuse" node with "Name: group1" and we want to connect it with nodes that have "Label: group1"

first select the target nodes and then, holding down the "Shift" key, select the "Diffuse" node last, then press the '"' key (or "à" or the corresponding key, depending on the keyboard you are using) and we notice that only the nodes with the corresponding character strings are connected
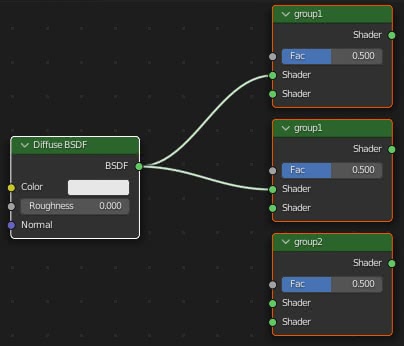
Link to multiple nodes (replacing links) that have the same name/label as the active node: [Shift+" or Shift+à]
As we have seen in the general case, any links present could be replaced by pressing the "Shift" key together with the '"' key
Connection to multiple nodes (without replacing links) that have the same name as the output port: [';' or 'è']
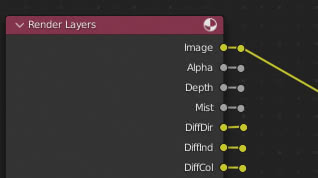
If we have a node with many outgoing ports, for example a "Render Layers" node,
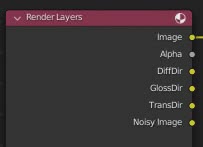
we can connect it with a set of nodes (in this example of the "File Output" nodes) having labels with the same name as that of the outgoing ports of the considered node

selecting the target nodes and, holding down the "Shift" key, selecting the source node of the links, then pressing the ";" (or "è", or another key to check if we have a different keyboard)

and all ports will be connected automatically
Connecting to multiple nodes (replacing links) that have the same name as the output port: ["Shift+;" or "Shift+è"]
As we have seen in the general case, any links present could be replaced by pressing the ";" also the "Shift" key
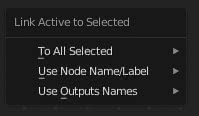
Show multiple links submenu: ["\"]
In addition to the main menu, which can be viewed by pressing the "Shift+w" keys, the functions for generating multiple links are also present in a submenu, which can be recalled by pressing the "\" key
How to add redirect nodes: ["/" or "ù"]
(It is similar to the function that, with Shift+drag of the mouse [Shift+RMB drag], holding down the right button creates a redirection node on an arc.)
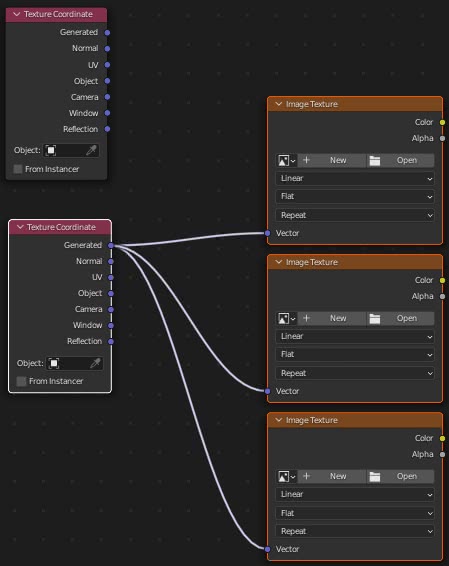
To keep the pattern of our nodes in order, it may be useful to create bifurcations on the arcs that start from a node. For example if we need to join a "Texture Coordinate" node to several nodes containing textures

We give "Edit > Preferences > Themes > Node Editor > Noodle Curving" a zero value, so that the arcs between the nodes become straight segments,

We connect the "Texture Coordinate" node to the farthest "Image Texture" node

then select the "Texture Coordinate" node and press the "/" key on the numeric keypad (or "/" on the alphanumeric keyboard or an alternative key, such as "ù") a popup menu will appear asking about what types of door in output we want to create the redirection node, in our case in an already connected output (the one from which the arc starts).
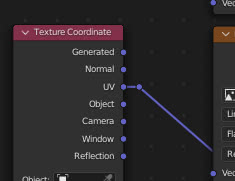
we select the redirect node and press "/" again, choosing the same option, thus creating a second redirect node
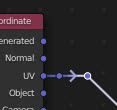
bring the second node down by pressing the "G" and immediately after "Y" and connect the first redirection node to the other two textures nodes, thus obtaining an orderly, clean structure, with arcs that do not cross nodes.

The option we used is "To Linked Outputs" which acts only on the arcs already present; "To All Outputs" also includes doors without arches
while "To Loose Output" acts only on unconnected ports

(Some ports may not be considered by the add-on during operations)
How to duplicate, disconnect, replace, copy nodes:
How to duplicate a node while keeping the connections: [Ctrl+Shift+d]
This function allows us to duplicate a node, keeping the connections upstream (almost never those downstream)
If there is a texture with its "Texture Coordinate" node
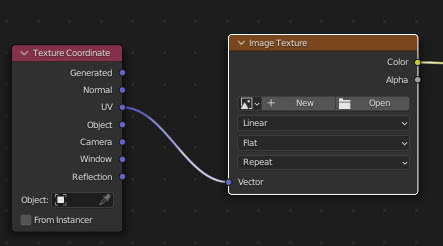
if we want to create a copy or a new "Image Texture" node, while maintaining the connection with the "Texture Coordinate" node, select the "Image Texture" node and press the "Ctrl+Shift+d" keys (to keep the pattern sorted , we also press the "Y" key while moving up) then move the mouse and confirm the operation by pressing the left mouse button

How to disconnect a node: [Alt+d]
Function used to disconnect a node without deleting it. For example, if there is a "Bright/Contrast" node to modify a texture used by a "Principled" shader
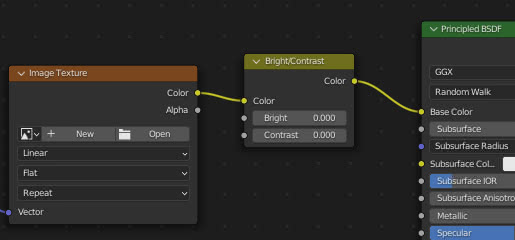
to disconnect it and see how the texture can be displayed without changes, select the "Bright/Contrast" node, press the "Alt+d" keys and move the mouse, dragging the node away
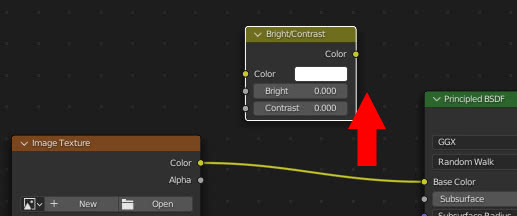
How to disconnect a node, keeping the incoming links unchanged: [Shift+Alt+d]
If we carry out the previous operation, selecting the node and pressing the "Shift+Alt+d" keys, the incoming arcs will be preserved

How to replace a selected node with a new menu node: [Shift+s]
This function allows you to replace a node with a new one from the menu, keeping the links intact when possible.
Using the same example as before, if we want to vary the saturation of the texture instead of the contrast, select the "Bright/Contrast" node and then press the "Shift+s" keys, a popup menu similar to the one for creating nodes will appear

selecting "Color > Hue/Saturation" will replace the node with the desired one.
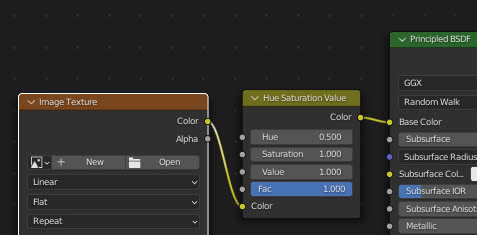
If a procedural texture is replaced with another procedural texture, similar parameters (for example: "Scale", "Detail" etc.) will keep the same values after replacing the node.
How to copy parameter values from a node of the same type: [Shift+c]
As we will see later for labels, you can copy all parameter values of a node at once. For example, if we are using a "Hue Saturation Value" node to modify a texture, we can use two similar nodes to quickly manage a configuration change

it is sufficient to select the node already connected to be modified then, holding down the "Shift" key, select the one from which we want to transfer the values, then press the "Shift+c" keys and select the "Settings from Active" option (ie we take the settings from the active node, the last one selected)

and the parameter values will be transferred to the connected node

to return to the previous values, just perform the same operation with the other backup node we had selected.
This function is useful with nodes that contain many parameters ("Mapping", "Brick Texture" etc. or even a "Normal", "Bump" or "Principled" node for which you always look for the ideal configuration and then come back because the previous one was better) with which we are carrying out tests and for which there is a need to switch between several sets of values; in fact it can work with more than two nodes and if there is the need to modify nodes with many similar values, just modify one and then transfer them to the others instantly.
How to manage labels:
How to change the label of a node: [Shift+Alt+L]
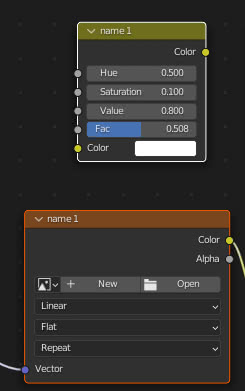
In the Shader Editor (in the Compositor etc.) it is possible to give a different name to a node, modifying its label. For example if we have the nodes
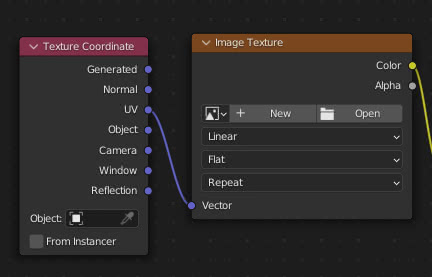
To change the label of the "Image Texture" node usually select the node, press "N" to bring up the panel on the right, insert a new label, for example "My Texture" in "Label" and then click press the "ENTER" key to confirm.

The Node Wrangler add-on also provides a function for editing the label: select the node concerned and press the "Shift+Alt+L" keys and a form will appear, where we enter a name, for example "My texture 1", in the "Add to Beginning" field
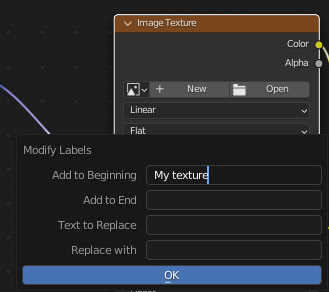
and the "My texture 1" label associated with the node will be created.
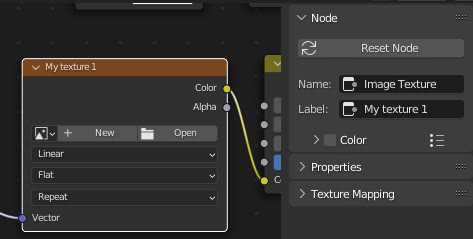
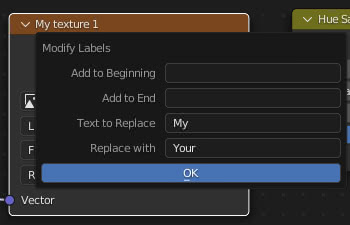
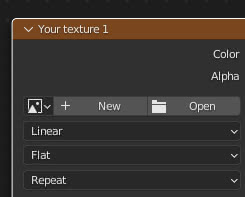
if we press the "Shift+Alt+L" keys again, we can modify all or part of the label text, for example by replacing "My" with "Your",
getting
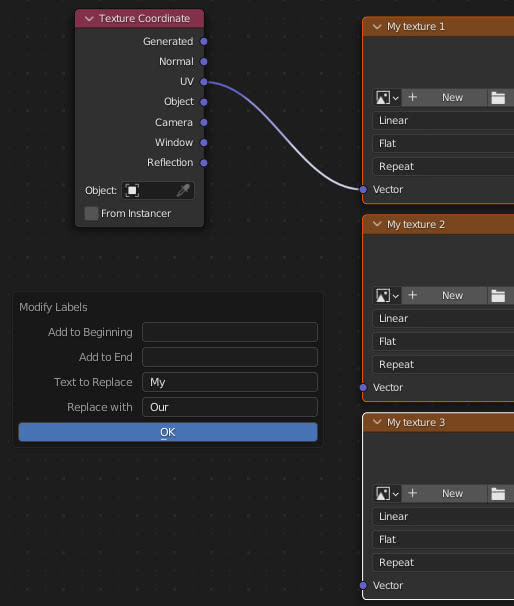
It also works with multiple textures, selected, at the same time
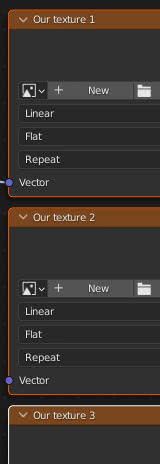
getting
To better classify textures we can add a character string at the beginning and/or at the end of the label
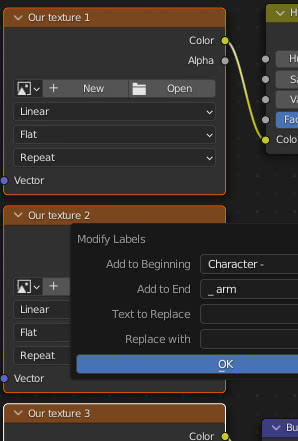
and will be displayed
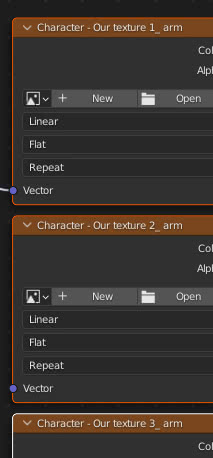
Copy a label: [Shift+c or Shift+v]
We have already seen the submenu that can be called up by pressing the "Shift+c" keys, which allows you to copy some parameter values from one node to another. However, we see that among the selectable functions there are those for label copies, grouped under the name "Copy Label"
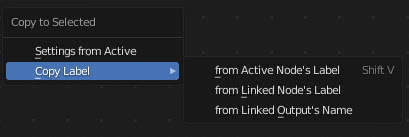
To copy a label we must first select the node where to copy the label then, holding down the "Shift" key, the node from which to copy the label (so that the active node is the one containing the label)
then either we press the keys e "Shift+c" and then we select "from Active Node's Label", or we press the keys "Shift+v" and the copy will be made.
Now let's see what the other two options are for. Given two nodes,
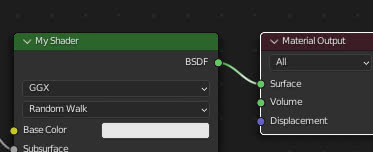
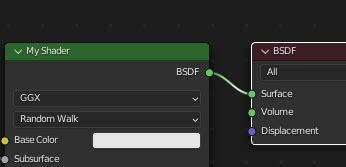
with "Material Output" already selected, pressing the "Shift+c" keys and choosing the "from Linked Node's Label" option
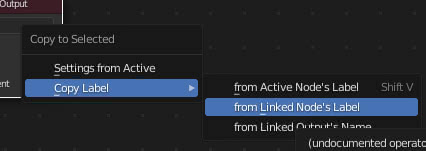
the label "My Shader", already present in the node to which it was connected, will be copied to the "Material Output"
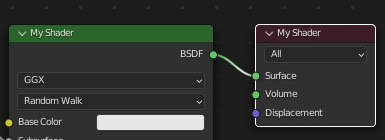
if instead we select the option "from Linked Output's Name"

the "Material Output" node will have as its label the name of the output port of the node to which it is connected, in this case "BSDF"
Delete a label: [Alt+L]
To delete a label, that is to make its field become an empty string, just select a node, press the "Alt+L" keys and click on "Clear Label".
The name that appears on the node will go back to being the one with which it was created.
It is a function that can be used on multiple selected nodes at the same time.
How to put the nodes in order:
How to enclose nodes in a frame: [Shift+p and then F9]
If we want to frame nodes with Node Wrangler, to create a distinguishable "logical unit" but without creating a group, we select them by holding down the "Shift" key
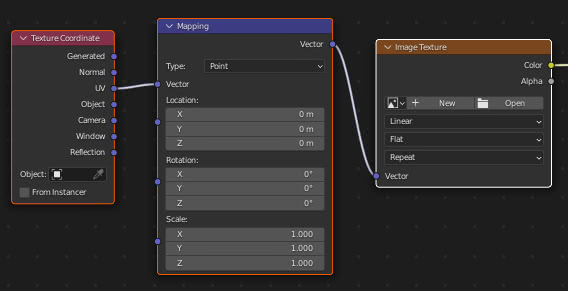
then we press the "Shift+p" keys and a box will be created around it.
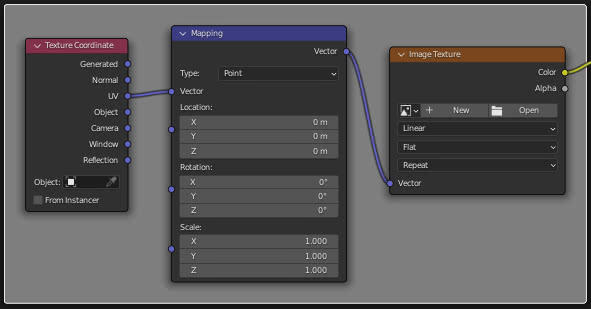
If now we immediately press the F9 key, without performing other operations after creating the box, a form will appear that will allow us to easily change its label and its color.

if we change color and insert the name "Texture Settings"

and by pressing the "ENTER" key, the changes will be made
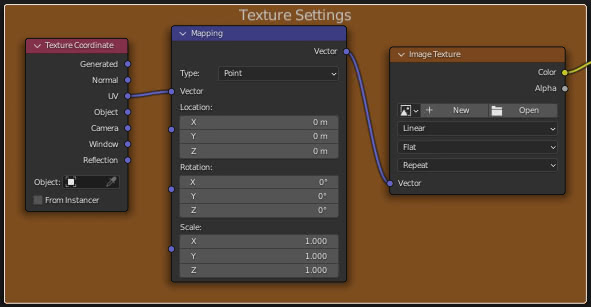
if we perform other operations on the nodes or in Blender, later we will be able to change the settings of the box only by selecting it and opening the panel on the right, pressing the "N" key, and accessing through the "Node" tab
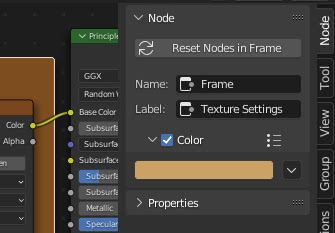
If we select the box and move it by dragging it (or by pressing the "G" key), all the nodes enclosed in it will also move
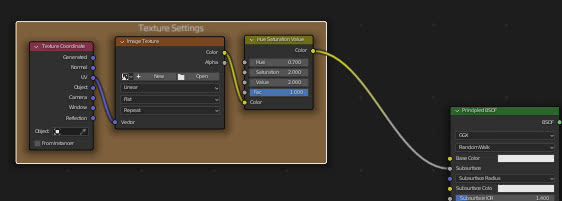
although the ability to move each node independently will be retained
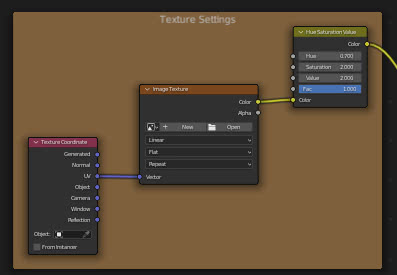
To delete the box just select it and press the "X" key
(Blender already provides a "Ctrl+j" hotkey to add a frame, only it creates it without activating the "Color" option and there is no possibility to change the name and color right away, by pressing the "F9" key)
How to delete unused nodes: [Alt+x]
When, after several attempts, we have built the final configuration for our node scheme, a bit of cleaning should be done by deleting the unused nodes.
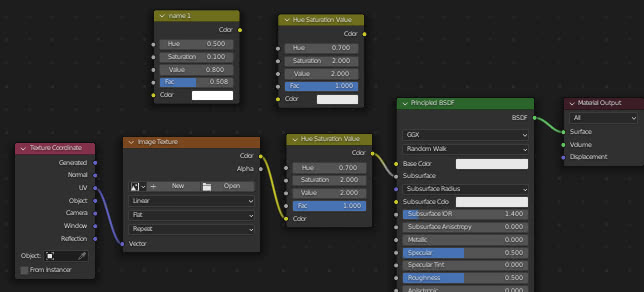
Also in this case the Node Wrangler add-on helps us, because just press the "Alt+x" keys and they will disappear automatically, after we have confirmed by selecting the "Delete Unused Nodes" option.
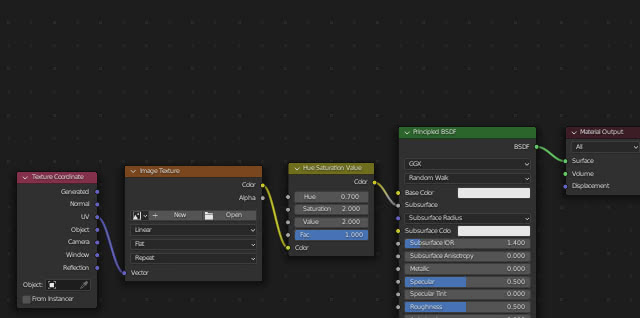
However, you must first remove any links to "Viewer" nodes created for the preview of the textures
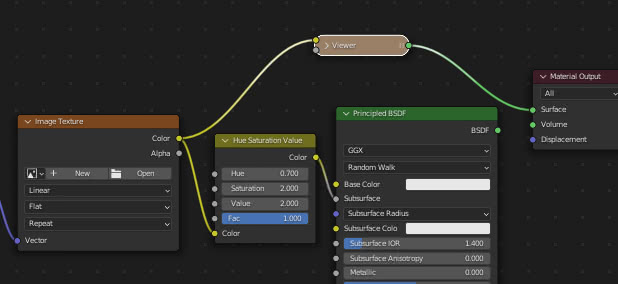
otherwise this function will delete the wrong nodes, considering the nodes of the correct path to the output as unused
How to align the nodes: ["Shift+=" (or Shift+"+")]
If after building the scheme there are nodes that are placed in a disordered way
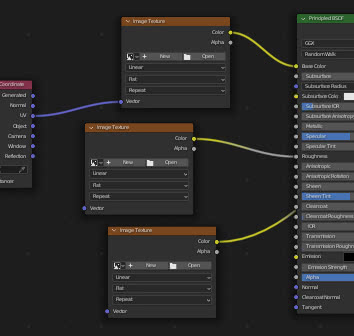
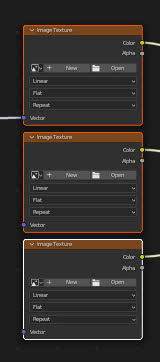
with Node Wrangler it is sufficient to select them and press the "Shift+=" keys (or Shift+"+" in some alphanumeric keyboards) and they will be sorted in columns and equally spaced. (You can also use this function to sort nodes horizontally)
End this guide here, also thanking the authors for this fantastic add-on. You can download a pdf, containing a list of Node Wrangler's shortcuts, at this address
Download Node Wrangler shortcuts pdf
Happy blending!
