Blender tutorial: how to add dirt to a wall
In this fourth tutorial of the mini-course in english for Blender "Blender course: from photo to 3D wall", we will see how to add dirt to the wall, with stains of humidity and mold, to which we had assigned a PBR material in the previous tutorial ("PBR material for brick wall"). To do this we will add three textures with drips, moisture infiltration and dirt, mixing them with the "diffuse" texture, before connecting everything to the "Base Color" port of the "Principled" node.
However, we will have to add three new UV maps, because the new textures we will use have different dimensions than those used to represent the brick walls.
First of all, however, let's rename the base UV map, the one that was created automatically, when we imported the "diffuse" map into the plan using the "Images as Planes" addon, changing its name even where it was later recalled.
We load the file "blender_wall_pbr_material_displace_modificator.blend" (the one where we had used the "Displace" modifier to create the embossed bricks) saved in the previous tutorial and on the right in "Object Data Properties > UV Maps" we rename "UVMap" to "wall"

Now let's change the name also where it was later recalled: in the "Normal Map" node that gave details to the bricks of the wall

and in the "Displace" modifier

Let's add the dirt of the water drips to the wall:
Now let's add the marks left by water when it comes down from the wall, stains due to humidity caused by rain.
In "Object Data Properties > UV Maps" we add a new map and call it "top drips" (and select it)

we access the "UV Editing" workspace by clicking on the tab at the top of the menu

download the texture TexturesCom_DecalsLeaking0270_1_masked_S.png from the site textures.com (at this moment it is located at https://www.textures.com/download/DecalsLeaking0270/85922) and using the "Open Image" button we load it in the "UV Editor" to the left

Remaining in the "UV Editing" workspace, in the "3D View" on the right we position the plane frontally, by pressing key 1 on the numeric keypad (as the plane is positioned parallel to the X axis)

update the UV map by pressing the "U" key and choosing the "Project from view" option, since the plane is two-dimensional and all its geometry is visible from the front.

The new map has been created in the "UV Editor" on the left (all of which can be selected by pressing the "A" key)

pressing the "S" key, and dragging the mouse, we resize it so that the width of the map coincides with the width of the texture

Then we press the "S" and then "Y" keys to resize it in height (to position the water drips only in a part of the wall) and the "G" and "Y" keys to move it (to start the drips of the water from above)

In the 3D View on the right we choose the Display Mode "Material Preview"

however, we see that only the image of the bricks is still present

this happens because we have not yet associated the image with the shader and therefore with the material of the object.
We select the "Shading" workspace by clicking on the relative tab in the menu

and in the "Shader Editor" move to the right (select and drag them with the mouse, or press the "G" and "X" keys) the "Principled" and "Material Output" nodes, to insert the new nodes between the node "Mix", coming from the "diffuse" texture, and the "Base Color" port of the "Principled" node

Now let's create an "Image Texture" node ("Add > Texture > Image Texture") and load the texture TexturesCom_DecalsLeaking0270_1_masked_S.png that we had used before: there is no need to load it again with the "Blender File View", because the reference is already present in Blender, then just select it using the drop-down menu

then connect the new texture to the "Mix" node previously present, using a "Multiply" node ("Add > Color > MixRGB" with "Multiply" option selected from the drop-down menu).

We use the "Multiply" option because we want the drips texture to blend with that of the bricks of the wall, while we connect the "alpha" port of the texture with the "factor" (Fac) port of the "Multiply" node to limit the operation to that part of the new texture that is not transparent.
We suggest to Blender to use the "top drips" mapping for the new texture, by entering its name in an "Attribute" node ("Add > Input > Attribute") which provides information on the coordinates through the "Vector" port.

Eventually you can add a "ColorRamp" node ("Add > Converter > ColorRamp") to control the black and white map of its "alpha" channel to mitigate or not its visibility and effect

In summary, the configuration of the added nodes will be

If we look at the preview above, however, we notice that the texture repeats itself, with an undesirable effect

this happens because the "Repeat" option is set in the "Image Texture" node, while in this case the "Clip" option is more suitable because you want the image not to repeat and the remaining space to be left transparent.

now everything is presented correctly

eventually we can go back to the "UV Editing" workspace to adjust the size of the map, with the help of the preview on the right

Let's add the dirt to the wall due to the infiltration of water from below:
When we look at a wall we notice that there are spots at the bottom due to "capillary rising damp"; they are more uniform, without the "accuminate tips" of the drips coming from above. We download a suitable texture from the textures.com website, in our case TexturesCom_DecalBottom0029_1_masked_S.png (from https://www.textures.com/download/DecalBottom0029/93494).
Let's create a new "bottom moss" map in "Object Data Properties > UV Maps" and select it

duplicate the nodes "Attribute", "Texture Coordinate", "ColorRamp", "Multiply" and put this new group in cascade to the nodes used for the previous map

We write in the "Attribute" field the name of the map "bottom moss" and select the texture "TexturesCom_DecalBottom0029_1_masked_S.png" in the node "Texture Image"

in the "UV Editor" of the "UV Editing" workspace we select the new texture

in the "3D View" in "Edit Mode" (keeping the "UV Map" "bottom moss" in "Object Data Properties" selected) we update the map by pressing the "U" key selecting "Project from View". Then we scale and position the map appropriately, using the "S" (to scale) and "G" (to move) keys.

Looking at the preview of the "Shading" workspace we see now

We bring the white slider of the "ColorRamp" node to 0.7 in order to better visualize some green mold

Let's add dirt in the middle of the wall:
Now let's add some dirt in the middle part of the wall, which can be due to various causes.
We download the texture TexturesCom_DecalsStain0055_1_masked_S.png from textures.com (currently located at https://www.textures.com/download/DecalsStain0055/76131), create the "dirty" map in "Object Data Properties > UV Maps" and select it

In the "Shader Editor" (workspace "Shading") we duplicate again the nodes "Attribute", "Texture Coordinate", "ColorRamp", "Multiply" and we put this new group in cascade to the nodes used for the map at the bottom of the wall (we report the white cursor of the "ColorRamp" node at position 1). Then we write "dirty" as the name of the map and assign the new texture to the "Texture Coordinate" node

In the "UV Editor" of the "UV Editing" workspace we load the new texture

in the "3D View" on the right, in "Edit Mode", update the UV map by pressing the "U" key and choosing the "Project from View" option. Then in the "UV Editor" we position and resize it (always pressing the "G" and "S"). In this case, however, we are only interested in a part of the image and therefore we position the map so that it only covers this area

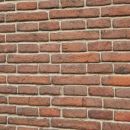
Let's try to render, remembering to select the UV Map "wall" as the active map, otherwise the right coordinates do not come out of the "Texture Coordinates" node, since we had not explicitly declared "wall" as the map for bricks

then press the "F12" key (or from the menu "Render > Render Image") and it will appear

Possible changes and improvements:
If we think that the dirt is too dark, we can act on the parameters of the "ColorRamp" node of the relative textures:
- for the upper texture we can give color #E9E9E9 to the white slider, in order to make the drips more transparent

- for the lower texture we can move the white slider to position 0.368 and give it color #E9E9E9, in order to decrease the effect of the black part of the texture and make the green mold stand out more

- for the dirt in the middle of the wall we will instead give the right cursor of the "ColorRamp" node the color #DEDEDE
- we also decrease the effect of the normal map, giving a value of 0.4 to "Strength" in the "Normal Map" node.

We start a new rendering with F12 and we get

You can download the project files here:
diffuse_map.jpg
displacement_map.jpg
height_map.jpg
normal_map.jpg
roughness_map.jpg
blender_wall_add_dirty_adaptive_subdivision.blend
blender_wall_add_dirty_displace_modificator.blend
TexturesCom_DecalsLeaking0270_1_masked_S.png
TexturesCom_DecalBottom0029_1_masked_S.png
TexturesCom_DecalsStain0055_1_masked_S.png
world hdri
For this tutorial on how to dirty a wall in Blender is all, in the next tutorials we will try to add graffiti/stencils made with Krita to the wall (Blender: how to add graffiti to a wall). Happy blending!
Back to "Blender course: from photo to 3D wall" course