How to create a comet with particles in Blender
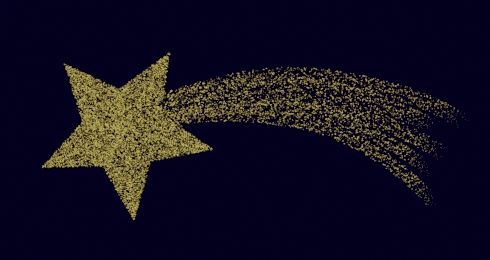
In this tutorial in english for Blender (updated to Blender 2.8) we will see how to create an animated Christmas comet. We do not want to obtain a photorealistic effect but of an artistic/representative type, like what we might find in some Christmas illustrations.
To build it we will create two groups of particle systems: two emitters for the star's body and a group of emitters for the tail, then we will add glitters and special effects.
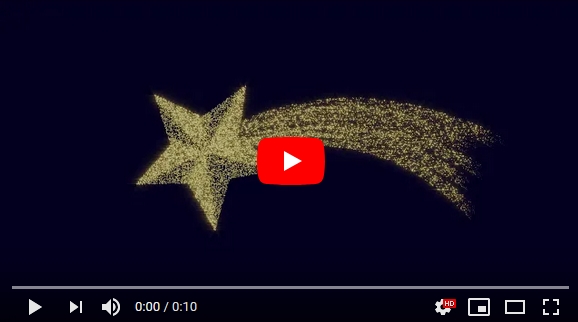
In the end an animation like this will be made
Modeling the star:
We start Blender and delete lamp, cube and camera; let's position ourselves in the "Top Orthographic" view and, pressing the SHIFT + A keys and selecting Mesh > Circle, we create a circle with radius 1 meter and 10 vertices, which we will call "Star"

In Edit Mode we select the vertices, one yes and one no, then we press the "S" key and we scale by writing 0.45 and confirming by pressing ENTER.

press the TAB key and enter in Object Mode, press the "R" key to rotate the star and write "-5.6" (5.6 degrees counterclockwise), at the end confirm by pressing the ENTER key.
Press the TAB key again and return to Object Mode, with the "A" key we select all the vertices of the star and click with the right mouse button making the Context Menu appear, in which we will choose the "Subdivide" function
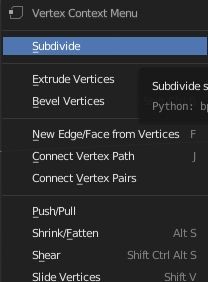
with which we will divide each side of the star into 6 parts

Let's now create the internal faces of the star: press the "E" key to extrude and immediately after the ESC key, without using ENTER to confirm, then press the "S" key to scale inwards and confirm with the ENTER key. We do this several times
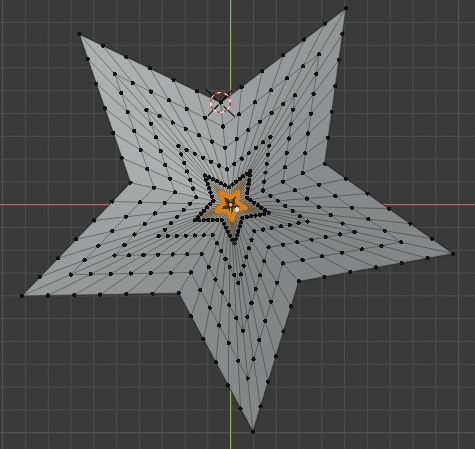
at the end we press ALT+M > At Center to join all the vertices in a central point.
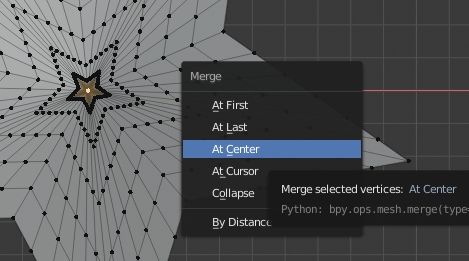
Press the "1" key on the numeric keypad to access the "Front Orthographic" view and at the top in the 3D View we activate Proportional Editing, with the "Linear" option

and in the star we select the central vertex, then we press the "G" and "Z" keys to move it upwards and thus give "thickness" to the star
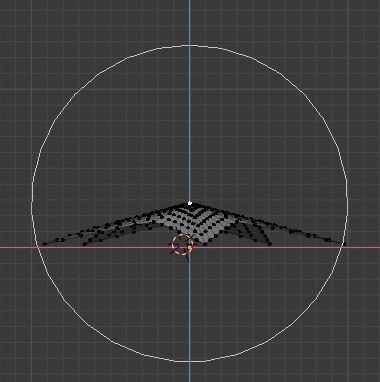
(We have divided the star so many times to better define the border areas between the shaded and light parts, given that all good or bad is based on the weights that are given at the various vertices of the various areas of influence)
The star's particles systems:
We now want to add "glitters" to the star, to do this we will create two particles systems, one that will define the bright areas of the star and one that will represent the shaded areas.
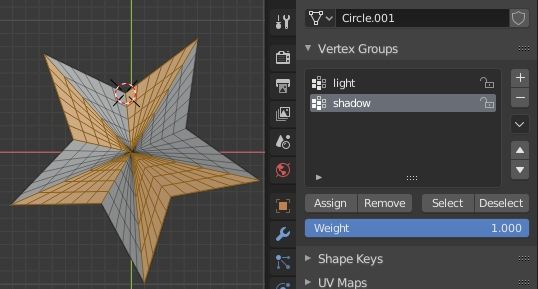
We enter Edit Mode and select the faces that we consider in shadow, with the "Face select" mode, then in the "Object Data Properties" tab of the Properties Window we create a Vertex Group, by clicking on the "+" button, which we will call "shadow" and we associate faces with it by clicking on the "Assign" button.
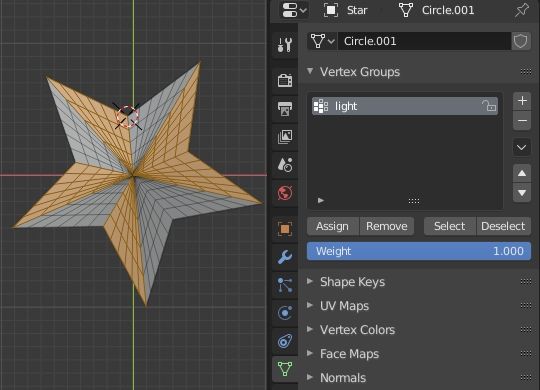
now in the 3D View we select the faces that will represent the illuminated parts, just press the CTRL+i keys to make the reverse selection regarding the current one, then add a "light" Vertex Group.
Let's go back to Object Mode and we create, with deformed icospheres using sculpting or proportional editing, 4 small stones to be used in the particles system which corresponds to the illuminated area of the star
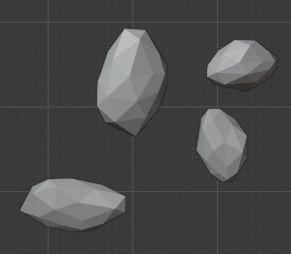
and we associate them with a simple material (which we call "stones_material_light") "emission" with hexadecimal color #E7CE5F

in whose properties we set a Pass Index: 1, which we will use later in the Compositing phase

we select all the stones and, pressing the "M" key, we insert them in a new collection that we will call "stones".
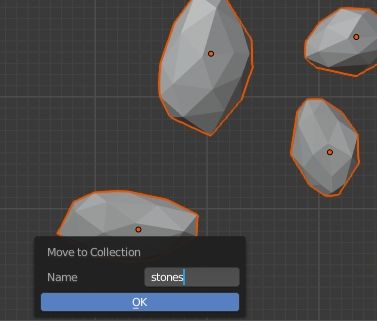
Now let's create the pebbles to be used in the shadow area of the star, duplicating the stones we had just created, then insert them in another collection that we call "stones shadow".
To the new stones (obtained through duplication) have been automatically assigned the material "stones_material_light". So let's click on the button (the one with two sheets drawn) "New Material" and a duplicate material will be created "stones_material_light.001"
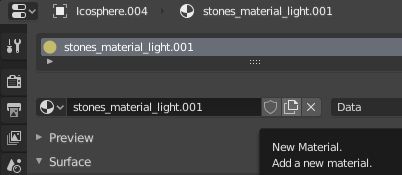
which we will rename with "stones_material_shadow"; then set Pass Index:0, because this material should not be influenced by compositing operations
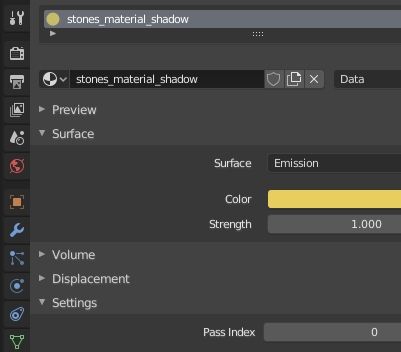
Now let's create the two particles systems, then select the star (to which we can associate any material, since you won't see it) and in the "Particle Properties" tab, in the Properties Window, add an emitter for the illuminated area, which we will call "star emitter light".

We set number of particles Number:20000, end animation End: 250 frames that is until the end of the general animation, life time of each particle Lifetime: 130 frames and we want a large number to be already present at the beginning of the animation, therefore we set Frame Start:-130 frames.
The particles must appear and disappear without detaching themselves from the star, therefore in the Velocity subpanel we set the surface normal speed equal to Normal: 0 m/s.
As particles we will use the icospheres created before, enclosed in the "stones" collection, then in the Render subpanel we set "Render As": Collection, the elements will be scaled to 0.012 using Scale:0.012 with a random variation for 80%, with Scale Randomness:0.8, and the emitter will not be visible by removing the check from the "Show Emitter" option, and we select the name of the collection to be used with Collection > Instance Collection: stones

The particles must not be subjected to the influence of gravitational force or of any other type, so in the sub-panel "Field Weights" we set Gravity:0 and All:0
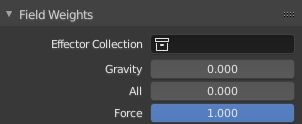
and they will have to be issued only in the areas that we wanted to consider bright and that we had selected before; then in the sub-panel "Vertex Groups" in "Density" we insert the name of the vertex group "light" that we had created before.

We now create the emitter corresponding to the shadow areas of the star and call it "star emitter shadow" with the same settings as "star emitter light",

unlike before, the icospheres of the "stone shadow" collection will be used
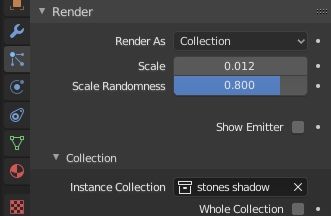
and the emitter will be limited to the shadow zone, defined by the vertex group "shadow".

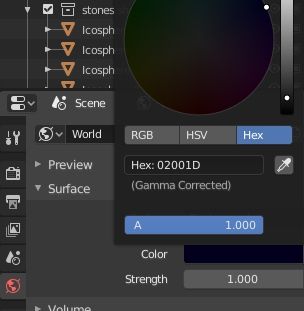
Now select the "World" tab, in the Properties Window, and choose as a background color a dark blue night, with "Color" of hexadecimal value #02001D.
Now start the simulation of the particles, pressing the SPACE key, then position ourselves in a frame, for example the number 54, and start a rendering of the image, pressing the F12 function key, and obtain
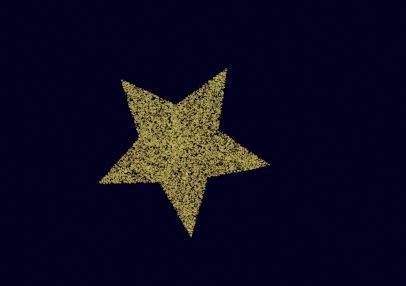
At the moment there is no difference between the two emitters, because the particles they emit are similar, while they will differentiate later, after processing the nodes in the Compositing editor.
The tail of the star:
Now let's create the tail of the star, which will be composed of multiple streams of particles along the curves.
We then create a plane, which will serve as an emitter, under the star and we will call it "Plane emitter 1"

however, we position it at the edge, as having removed the tick from the "Show Emitter" option, the actual star will not be visible and any flow below it may be noticed

In the "Particle properties" tab of the plane we create a particles system "Tail emitter 1" (ie the first of the comet's tail emitters), which emits a number of particles Number: 2500, the end is equal to End: 250 frames that is up to at the end of the complete animation, the life time of each particle is Lifetime: 200 frames and, in order to have most of the particles present at frame 1, Frame Start has been set: -200 frames.

The tail emitters will use the same icospheres as the illuminated part of the star, so also in this case we will choose in the "Render" sub-panel Render As:Collection and Collection > Instance Collection:stones; in this case also resize with Scale: 0.12 and random variation Scale Randomness:0.8
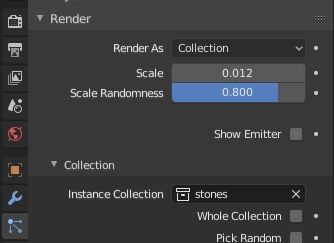
The particles must not undergo any effect due to gravity, so in the "Field Weights" subpanel we set Gravity:0

We press the SPACE key and start the simulation
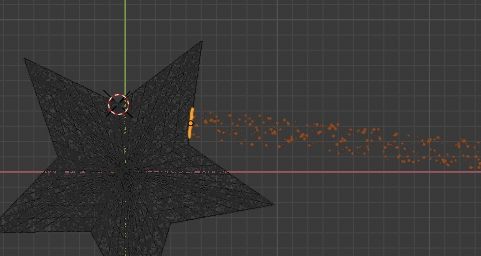
As you can see, the emission occurs along the normal direction to the plane, but we want it to follow a curve, as happens in the classic graphic representation of the Christmas comet. So let's create a curve Bezier that we will call "Tail line 1"
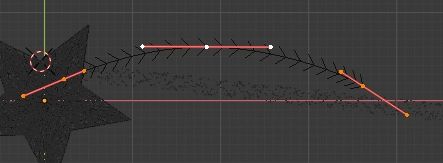
and, keeping the curve selected, to force the emission of the particles we create in the "Physics Properties" tab, inside the Properties Window, a "Force Field" of the "Curve Guide" type (leaving the default settings) .
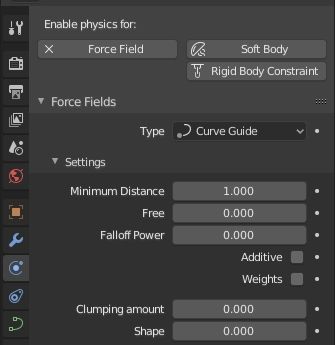
We start the simulation with the SPACE key and we get

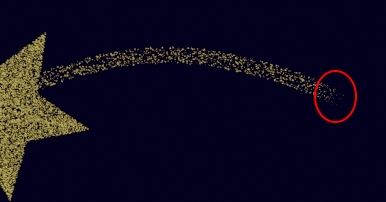
which is the desired effect. But if we start the rendering we notice that the tail ends too sharply
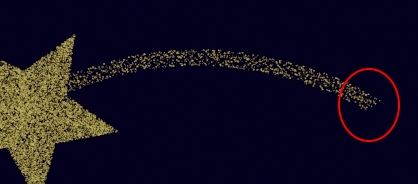
then we try to control particles with a texture, making them smaller at the end, in order to smooth the emission curve. We therefore select our emitter plane "Plane emitter 1" and, selected the "Particle Properties" tab of the Properties Window, in the "Textures" subpanel we create the "blendtexture" texture.

By keeping "blendtexture" selected, we activate the "Texture Properties" tab in the Properties Window and choose "Blend" as the type of texture, which will allow us to create a procedural gradient texture that will be used as a mask for the particle size reduction function.

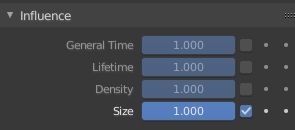
The texture will only influence the size of the particles, so in the "Influence" subpanel we put the check only on "Size"
>
Since it is associated with a particles system, we set in the Mapping > Coordinates: Strand/Particle subpanel

finally in the "Colors" subpanel we activate the tick on "ColorRamp" and create a white "color stop" in position 0.88
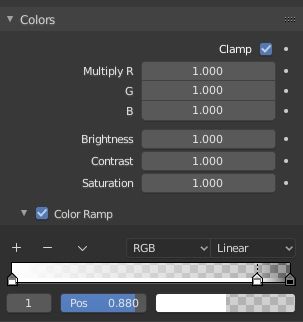
press the SPACEBAR button to start the simulation and render the image corresponding to a frame, noting now that the effect is at the end more smooth.
If we look at the 3D View, we can see that a circle has appeared around the star: it represents the force that drives the particles on the curve.

Now select the emitter plane "Tail emitter 1" and the Bezier curve "Tail line 1" then press the "M" key to enclose them in a collection that we will call "Tail 1"
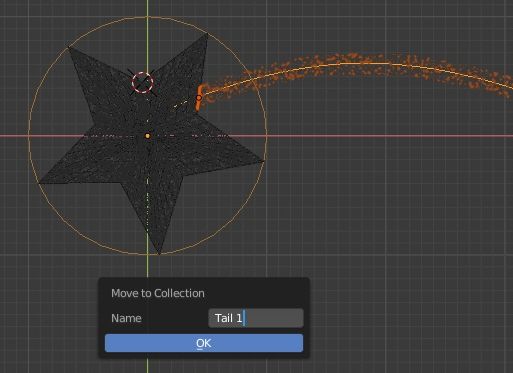
and this tree will appear in the Outliner.

To ensure that the particles of the "Plane emitter 1" particles system, in "Tail emitter 1", are influenced only by the forces contained in the "Tail 1" collection, we select "Plane emitter 1" and in the "Particle Properties" tab, in the sub-panel "Field Weights", we select "Tail 1" in the drop-down menu of "Effector Collection"
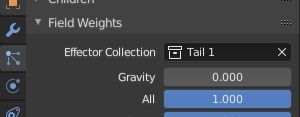
To create the rest of the comet star's tail, we create 4 other bezier curves "Tail line 2", "Tail line 3", "Tail line 4", "Tail line 5", with the respective "Force Field"

and 4 floors "Plane emitter 2", "Plane emitter 3", "Plane emitter 4", "Plane emitter 5", superimposed on the edge of the star

but positioned below

For all the planes and curves we must perform all the operations that we had carried out in the first case (creating the "Tail emitter" particles system 2 .. 3 .. 4 .. 5) with the same settings.
We can use the same "stones" and the same "blendtexture" texture, making sure that all the settings are correctly replicated.
To keep the influences of the relative forces separate, it is then necessary to create the related collections Tail 2, Tail 3, Tail 4, Tail 5 where to insert the respective planes and curves until obtaining

remembering then to select in the emitter plane, in the subpanel "Field Weights" in "Effector Collection" the relative class (for example, for "Plane emitter 3" insert "Tail 3")
If the replication work was done correctly, if we start the simulation by pressing SPACEBAR and render in a certain frame, we should get
[How-to-create-comet-particles-blender-50.jpg]
Illuminate the comet star with the Compositor
Let's now illuminate the particles created before with light and sparkles.
Then select the "Compositing" workspace and check the "Use Nodes" option and the "Render layers" and "Composite" nodes will appear immediately.
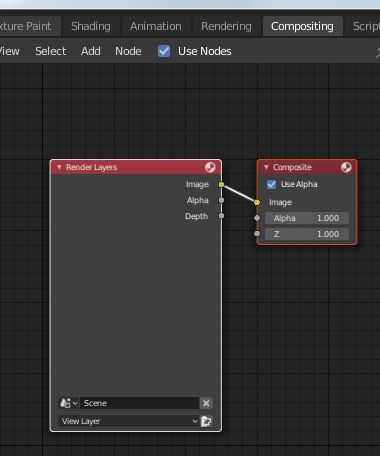
Now press the SHIFT + A keys to bring up the "Add" menu in which we choose Output > Viewer; connect the newly created "Viewer" node to the "Render Layers" node, start the simulation by pressing the SPACEBAR key and then we render the image at one of the frames, a preview of the rendering will appear in the Compositor accordingly, where in real time we will see the changes made with the nodes.

In order to act on the particles, we must be able to select the material, so we choose the Cycles rendering engine in the "Render Properties" tab of the Properties Window (in our case it was already selected, but it doesn't matter)

In the "View Layers Properties" tab we tick the "Material Index" to activate the connection to the "Render Layers" node, thus acting on all those objects in the rendering that have a certain material

So we see that the "IndexMA" port has appeared in the "Render Layers" node

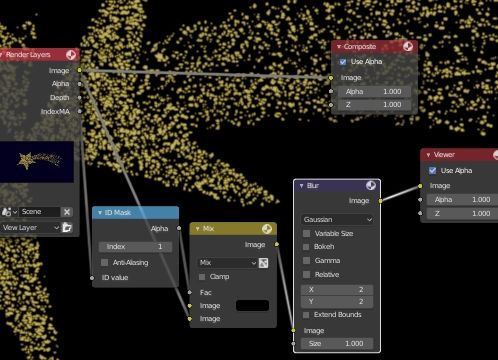
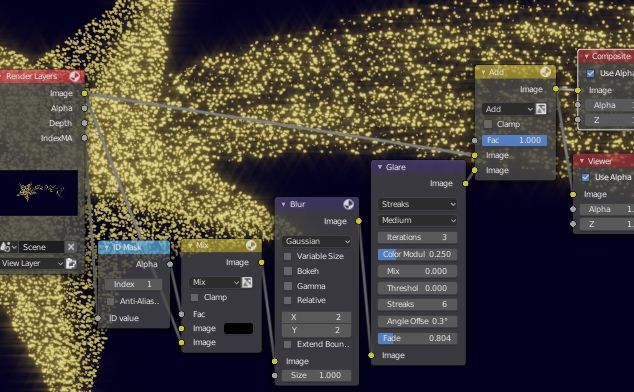
We connect to it by pressing the SHIFT+A keys or by selecting from the Compositor menu the Add > Converter > ID Mask node, with Index:1 corresponding to the "stones_material_light" material that we had created before, thus obtaining a selection mask for the particles

therefore we create an Add > Color > Mix node to derive the actual particles from the rendered images

now add some blur to the particles, to smooth the edges, creating the node with Add > Filter > Blur, with offset of 2 both in the x and y direction
We create the Add > Filter > Glare node to associate a glitter to the particles, the "Threshold" field has a low (or zero) value because the background of the star is not black, but blue, so it would not be seen with higher values, and we want the particles as brightly as possible; the stars will be 6-pointed and slightly rotated.
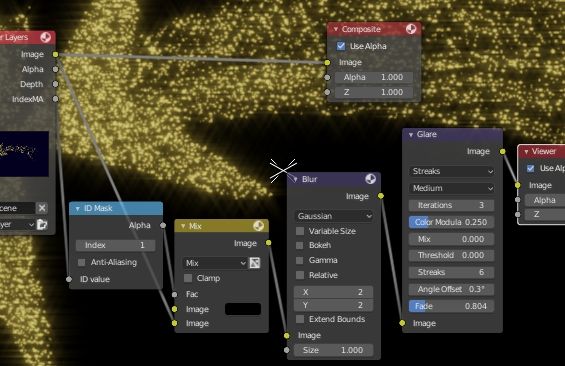
At the end we combine the effect obtained with the rest of the image: we add an "Add" node by selecting Add > Color > Mix, but choosing the "Add" option in the drop-down menu, and we also connect it to the "Render Layers" node and to the "Composite" node for the final output.
We start the simulation again, by pressing the SPACEBAR key and, after having simulated all the frames, we set the export format in the Output Properties > Output tab (the PNG sequence is always recommended, so you can recover your work in the event of a crash), choose the right size in Output Properties > Dimensions and, after saving the .blend file, start the rendering of the frames by pressing the CTRL+F12 keys, thus obtaining our animation. Happy blending!
![Resize particles by blend textures in Blender [ENG]](../../../../immagini/copertina/cover2_130x130.jpg)