Blender convert a sequence of images into mp4 video
In this tutorial for Blender we will show you how to convert a sequence of images into an mp4 video for Youtube using the Video Sequence Editor (VSE).
When rendering an animation with Blender it is advisable not to save it immediately as a movie, but as a sequence of images (in PNG format, as it is the one with the best quality / compression ratio and is compatible with many softwares) and in order to resume rendering from a certain frame onwards in the event of a crash, both in order to divide a rendering into several parts, to be carried out comfortably in the most convenient moments.
However, there is a need to export the video in other formats to show it to the public (in a youtube video, on a web page or even just to view them with a player) or to compress all the animation in a single file of size smaller and more compact.
Upload the image sequence:
To transform the sequence of images, we will use the Video Sequence Editor (VSE), one of the many precious tools contained in Blender, which has many features in common with the best professional video editors.
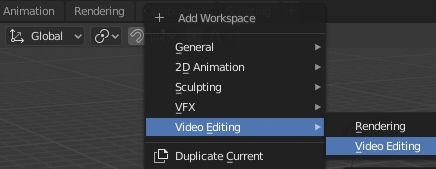
In the top menu we select the "Video Editing" workspace or, if it is not present, we add it by pressing the "+" button on the right
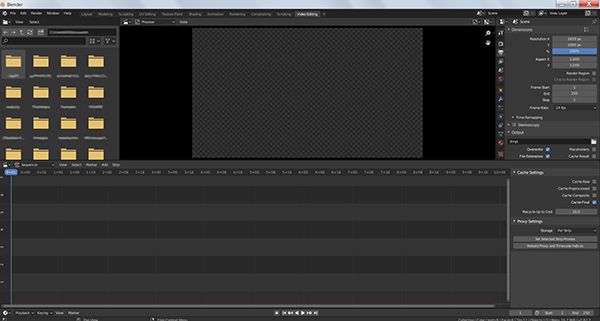
and we will display the editor with the list of directories, the preview of the video, the Properties Window, the channels of the Video Sequencer and the panel with the properties of the currently selected instrument
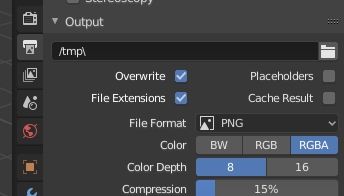
When we render an animation, the files will be inserted in the directory whose path is indicated in the "Output Properties" tab, in the Properties Window at the top right, in the "Output" subpanel.
We add the sequence of images by selecting, in the menu above the channels of the Video Sequencer, Add > Image/Sequence

then the popup window will open to import the files and we select the directories whose path we had noted before in the properties

We now select the images to be imported, we have different modes available:
-
Selecting all the images by pressing the A key (a useful method, which can be implemented without problems if in the directory there are only the files we want to upload)
![]()
- Using the rectangle selection tool, activated by pressing the "B" key, we can select only the files that interest us
-
Selecting part of the images with the keyboard: click on the first file and, holding down the SHIFT key, click on the last
![]()

On the right are the import options, we leave the default options unchanged: Start Frame:1, End Frame:26, Channel:2 and immediately press the bottom button "Add Image Strip".

In this example we have loaded a number of frames so that it is equal to the value of "End Frame" (26); if it had been smaller, a filling area on the right of size = End Frame - number of loaded frames would have been created.
The Frame Rate is set to 24 frames per second, so the sequence of 26 images is longer than 1+00, that is longer than a second, also we can see that it has been positioned in channel number 2. The Start Frame value indicates the position where the frames will be placed in the channel.
Convert the image sequence to an mp4 video file for Youtube with Blender in the Video Sequence Editor:
Once the sequence of images has been imported, we try to convert it into a single mp4 file, which can eventually be uploaded to Youtube. We therefore use the Properties Window options that we can find in the panel at the top right.

We select the "Output Properties" tab and in the "Dimensions" subpanel we set the dimensions that the movie must have; these may correspond to the dimensions of the images in the sequence, or to the dimensions of the movie we want to create (for example, if we want to export the movie to upload it to Youtube, a good resolution could be 1920x1080). We also set the duration or portion of the animation in frames and the frames per second of the animation (24 or 25 frames per second should be fine for common viewing, but for movies where you want to save you can get up to 15 fps, while for movies with fast animations you can set 60 fps)
In the "Output" sub-panel we open the "File Format" drop-down menu and we see that there are various formats, both image and video; select "FFmpeg video" which will provide us with the features offered by the FFmpeg video conversion software (if you want to use it in standalone mode for other purposes, you can download it from https://www.ffmpeg.org/, but in our case it is already included in Blender)

All the formats supported by FFmpeg regarding the container appear, the video codec and the audio codec

If we open the Encoding > Container drop-down menu we can see the list of containers made available by FFmpeg

for each container we choose, a different list of "Video Codec" or different options associated with the single container will appear, in cases where there is a 1:1 correspondence between the codec and the container.
For example, if we choose MP4 as a container, we can choose between these codecs

and related codecs (AAC is recommended for Youtube) for a possible audio file,

which can be loaded and placed in another channel by selecting the Add > Sound command in the VSE menu

Close to the word "Encoding" you can click on a button that allows the selection of some presets, useful for speeding up some operations. For example, if we want to upload the video file to Youtube, we can choose a format with MP4 container and H.264 video codec, so just select "h264 in MP4"

Returning to look at the other video options:

"Output Quality" indicates the quality that the movie must have, we recommend the "Medium quality" value for the tests and "High quality" for the final version. If you don't want to lose any detail you can choose "Lossless" (without loss of data, but the file afterwards will be much larger).
"Encoding Speed" indicates the encoding speed: greater coding accuracy will take longer, but the encoded file will be smaller.
Once the settings for exporting the video have been completed, we check that the "Sequencer" option is checked in the "Post Processing" sub-panel,

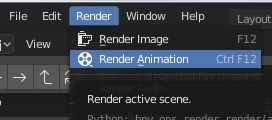
so to start coding we press CTRL+F12 or select in the menu Render > Render Animation, as when we start rendering the animation,
and, when finished, a new file will be created in the output directory whose name will take into account the imported frames and the chosen format, for example "0001-0026.mp4".
Here ends the tutorial for Blender to convert a sequence of images to mp4 video, so you can show your fantastic animations made with Blender on Youtube, the procedure is fast enough, but you have to pay attention to the codecs, perhaps installing free packages like K-Lite (Windows) and good players like VLC Media Player. Happy blending!