Blender how to import DWG and DXF CAD files
In this tutorial in english (updated to Blender 2.8) we will see how to import a DWG file into Blender, after turning it into a DXF file. These two file formats are very important in the world of architecture and mechanics because they are usually generated by CAD programs widely used by architects and engineers; there is therefore the need to make Blender communicate with this environment in order to be able to import models downloaded from the Internet, to have 2D plans to extrude to create complete buildings, to texturize and animate 3D models, thus realizing a realistic preview of the project carried out.
However, Blender does not have an addon for the direct import of .dwg files, because this is a proprietary binary format whose specifications have not been officially released, while instead there is the one that decodes the files of type . dxf, a format used to exchange data between the various CAD programs. So we need a tool that converts DWG files to DXF files.
In this tutorial we will first show how to convert a DWG file into a DXF file, then how to import the DXF file into Blender and how to perform some operations to turn everything into a mesh. At the end some problems that might arise and some possible solutions will be presented.
As a test to use in the tutorial, we will try to import this 2D map, included in a more complex project saved in a DWG format file:
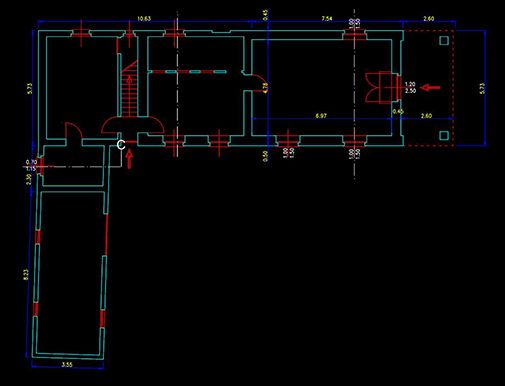
Note: if you created the DWG file or you have the possibility to modify it, remember to center the drawings in the axis origin, to clean up the project from lights, dimensions and writings, to reduce the number of layers, and finally to convert the scale into meters.
Convert a DWG file to a DXF file:
A small premise: the DXF format has not always been adequately updated with the development of the DWG format, so it may happen that support for complex and advanced objects and structures has not been implemented in the DXF format, especially in the older versions.
To convert the file from DWG to DXF we will use the free ODA File Converter software (once called Teigha File Converter), which you can download from www.opendesign.com, created by the Open Design Alliance, a non-profit consortium that dealt with the reverse engineering of the DWG format, also creating one of the most famous open source libraries for its decoding.
The software is available for Linux, MacOS X and Windows
We install and start the program

Select with the "..." buttons the directories where the files to be converted are present and where you want the files to be inserted in .dxf format; if more than one .dwg file is contained in the input directory "Input Folder", they will all be converted and saved in the "Output Folder" output directory. If the "Recourse folders" option has been set, the files will also be searched for in the subdirectories of the input directory.
(The "Audit" option is used to perform a check and repair activity on the input files).
So let's choose the "R12 ASCII DXF" format (maybe even R14 could be good, but it depends on the type of elements included in the project) and we perform the conversion.
Import the DXF file:
We start Blender, pressing the "A" key we select all the elements present (lamp, camera and cube) and pressing the "X" key we delete them. We press "7" in the numeric keypad, thus selecting the "Top Orthographic" view.
If it is not already present, we activate the addon "Import AutoCAD DXF Format" in Edit > Preferences > Add-ons (the one without warning signal)

From the main menu at the top, select File > Import > Autocad DXF to load the .dxf file (the current version of the addon is 0.9.6)
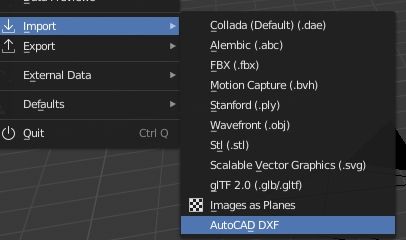
The "Blender File View" window will appear and to the right you can see the various import options:

They indicate how the various elements contained in the DXF file will be encoded and represented in Blender: how the sets of symbols and objects that represent the Autocad blocks will be grouped, how the layers will be coded, whether the auxiliary objects must be represented or not, as the resulting elements must be represented, which coordinate system must be used.
We do not modify the options, we load the file and after a few moments we process it the result appears, but with extraneous converging lines

What happened? If we zoom out (a lot of zoom out), we discover that the map was actually imported, but there are these extra lines
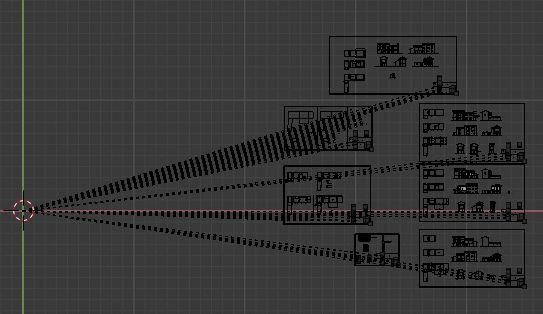
As you can see they are in correspondence of the text, so let's try to import the file again, but removing the check for "Import Text"

and we will get a better result

Now let's turn everything into meshes, but first in the Outliner on the right we select everything that is not mesh or curve, click with the right mouse button and delete it
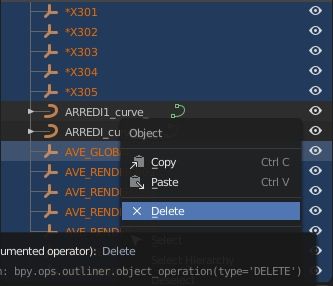
Let's now position ourselves in 3D View and in Object Mode, select everything by pressing the "A" key and convert everything to mesh, selecting, in the 3D View menu, Object > Convert To > Mesh from Curve/Meta/Surf/Text

and we get all the planimetry transformed into a mesh, thus ending our import
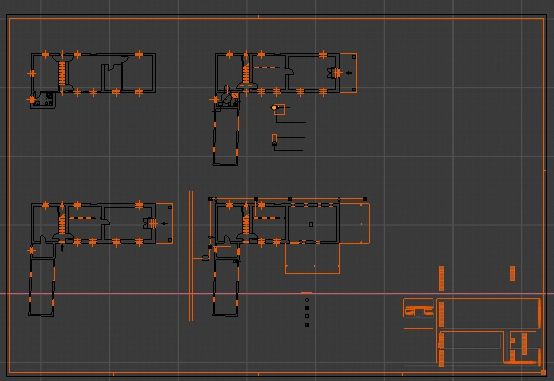
from which we can obtain the elements we need to be able to continue our work depending on the reason why we need the plan: to use as a reference to trace, or if we want to use the walls as a base to extrude; in this second case we could select the uninteresting parts, in order to separate or delete them.
Before continuing any type of processing, however, remember to remove the double vertices, in Edit Mode, which could possibly be present in each object, by selecting Mesh > Clean Up > Merge by Distance.

Solving some problems:
Not always, however, the importation of a DXF happens successfully, sometimes because there are real problems, sometimes they are only apparent. Let's see some of them:
- When I import the DXF file, Blender displays an error message
- This can sometimes happen because you try to open a DXF file with a data structure not supported by the Blender addon that is reading it, if you can try to convert the DWG file to DXF R12.
- I imported the DXF file, but nothing is visible, not even in the Outliner
- Probably in the DXF file are contained advanced elements not supported by the conversion script, or there were too many layers.
- I imported the DXF file, we see that there are objects in the Outliner but not in the 3D View
- The objects maybe there are but they are far from the origin of the axes or they are very large (it can happen because Autocad uses the measures in centimeters and Blender in meters). To solve the problem select the objects in the Outliner, set the Top Orthographic in the 3D View, by pressing the "7" key of the numeric keypad, and then press the SHIFT+C keys (or selecting in the menu View > Align View > Center Cursor and View All or View > Align View > View Lock to Active), or "/" on the numeric keypad, or the "Home" button (or zoom out with the mouse wheel). In this way all the objects present in the scene will be included in the visible area and it will be enough to scale and center them to make them available.
- I see all the objects in the 3D View, but not all of them in the Outliner
- There may be dependencies / relationships and the objects are nested one inside the other.
- I can't extrude the lines of the plan
- Some of the lines could be encoded as Bezier curves, converted into meshes before trying to extrude them.
Finish here this tutorial about how to import DWG and DXF files into Blender. Even if Blender is not a CAD program it can be useful in the field of Architecture due to its ability to create photorealistic renderings and interesting animations, thus giving the possibility of combining the advantages of design and artistic visualization. Happy blending!
![Resize particles by blend textures in Blender [ENG]](../../../../immagini/copertina/cover2_130x130.jpg)
