Blender change shadow intensity and color with the Compositor
In this tutorial for Blender (updated to version 2.9) we see how to change the color and how to darken/lighten the shadow of an object in the Blender Compositor. This can be especially useful when we want to add a 3D object on a pre-existing photo, to better adapt the shadow to the light and objects present in the image, without having to render the scene with each change.
Let's create the 3D scene:
As an example of a model to be used for photo insertion, let's create a simple cube with its shadow: let's start from the default scene and give the cube color #95A6FF, in the "Material Properties" tab of the Properties Window

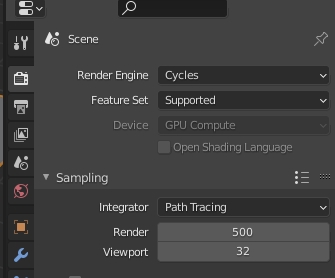
we raise the cube and create under a plane, we place the camera, set Cycles as rendering engine, in the Render Properties tab of the Properties Window, and 500 Samples for the Render
we press the F12 key to create the rendered image

To hide the plane, but not the shadow of the cube, we select it and in the Object Properties tab of the Properties Window, in the Visibility subpanel, we set the option "Shadow Catcher" (that is, we consider it only as a "shadow catcher")

we eliminate the background of the rendered image by checking the "Transparent" option in the "Render Properties" tab > Film

we start the rendering and we get the object with only its shadow

As you can see, in the figure there are two types of "shaded areas": the part of the cube not exposed to light (1) and the shadow that is projected on the plane, now invisible, (2)

We will now try to lighten the two "shadows", independently of each other, using the Compositor, in order to limit the number of renderings to be made in case we want to modify the intensity several times to better adapt it to a photo.
Change shadow intensity using scenes in the Compositor:
In this method we will use the "scene", to separate the cube from its shadow on the plane and organize their management in a simpler way.
Then in the text box, top right, we rename the current scene (which will contain only the cube) as "Cube scene"

now click on the button on the right to create a new scene, the one that must contain only the shadow on the plane,
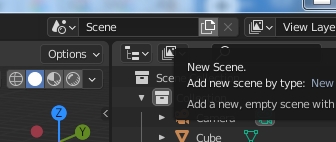
and choose as option "Full Copy", to copy all the objects from the first to the second scene
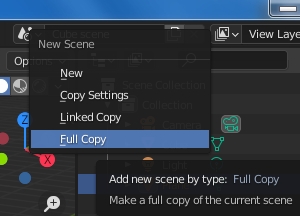
and a copy of all objects from the first to the second scene will be created

let's rename the second scene as "Shadow scene"

In the "Shadow scene" we have to delete the cube, but we want it to continue casting the shadow on the plane, so we don't delete it, but we hide it from the camera: we select the cube and, in the "Object Properties" tab, in the Visibility panel > Ray Visibility uncheck the "Camera" option

Now we remove the plane from the first scene, hiding it during rendering: select the "Cube scene" from the drop-down menu

in the Outliner we activate all the options for visibility
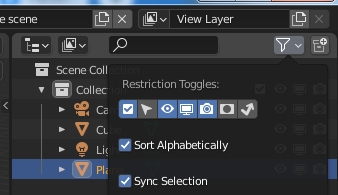
so we disable the rendering of the plan

select the "Compositing" workspace and activate the "Use Nodes" option

Two nodes immediately appear: "Render Layers" (with the scene already set to "Cube Scene") and the "Composite" node, which represents everything that will appear in the final rendering.
We add another node "Render Layers", using the command in the menu Add > Input > Render Layers, and in its drop-down menu select "Shadow scene"

these two nodes represent what is rendered in the two scenes, the one with the cube and the one containing only the shadow.
Now select the "Cube scene" in the drop-down menu and activate, in the "View Layer Properties" tab, the Shadow Pass which allows you to collect information on the shadows that we will need to work on a specific area of the cube

The Shadow Pass creates a mask: the illuminated parts of the scene are light in color, those corresponding to the shadows and the background (without illuminated elements) are black. If our scene had two visible orthogonal planes as a background
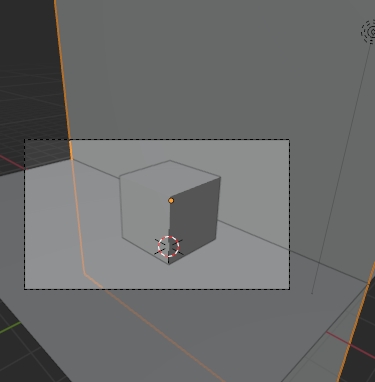
The mask would look like this, in which we can see: the illuminated part of the cube (1), the illuminated planes (2-3), the shadowed part of the cube (4), the shadow of the cube on the plane (5), the background (6)

In our case, however, the plane is invisible, so if we add the Viewer node with Add > Output

and we connect it with the shadow port

we start the rendering and in the Compositor we visualize

using the output of the alpha port that provides a mask, which represents the objects present in light color and the transparent background in black

we can subtract the values of a mask to another, using the Math node with Subtract option, which we add with Add > Converter > Math

for which we select the "Subtract" option instead of "Add" and we get the mask
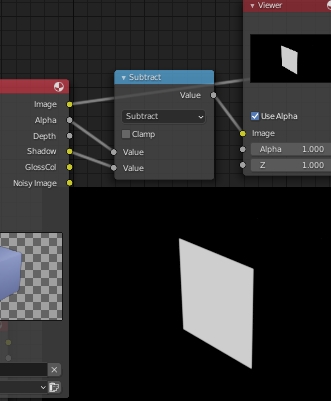
which will allow us to work only on the shadowed part of the cube that interests us.
So let's add the RGB Curves node, from the Add > Color > RGB Curves menu, insert the mask obtained previously in "Fac" and the scene rendering in "Image", modify the curve of the combined channels (Combined RGB -> "C" ) and thus make the shaded area of the cube clearer

It is advisable to use the RGB Curves node, or similar, as the shadow part of the object is usually colored, so for a better result it may be necessary to act on each single channel separately.
Now we make the shadow of the cube on the plane clearer. To lighten a shadow, however, we must not make the shadow image brighter, otherwise in the end we will have a white image, but make it more or less transparent, so we must increase or decrease the intensity of the mask of its alpha channel and modify consequently the image of the shadow.
From the "alpha" port of the Render Layers node of the "Shadow scene" we extract the mask

To modulate the intensity and influence of the mask we use the Bright/Contrast node (Add > Color > Bright/Contrast) which allows you to darken the mask

this allows us to increase the transparency of the shadow image using the SetAlpha node, acting on the part of the image delimited by the mask. So let's add the SetAlpha node, with Add > Converter > SetAlpha, and by setting an appropriate value of "Bright" we modify the transparency.

Now we add the results of the work carried out on the two scenes, using the Add > Color > Alpha Over node, placing the cube in the second "Image" input with "Fac" = 1
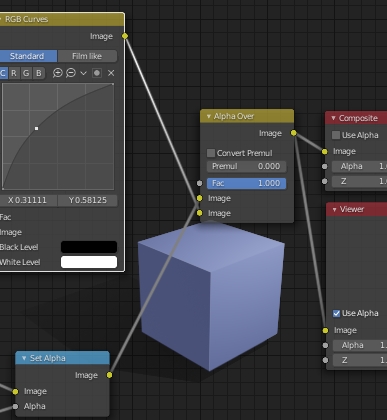
activate the "Use Alpha" option in the "Composite" node

and we start the rendering, pressing the F12 key, thus obtaining the desired result, which we can save and use later

note: it may happen that, perhaps due to an error, you do not see the correct result of the "Composite" in the rendering, then first select View Layer and then again Composite in the rendering window

To insert a background image, you can add it using the Add > Input > Image node and connect it to the cube and its shadow with another "Alpha Over" node (linked to the previous one we talked about before). For example, if we want to put the cube over the image of a floor, downloaded from Pixabay.com, setting Bright:-23.3
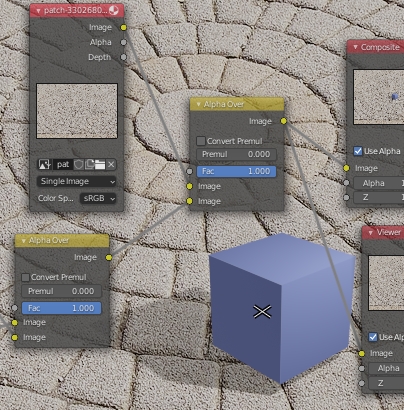
by rendering we will get

Change the color of shadows using scenes in the Compositor:
We use the previous nodes to color the shadows.
We use the "Alpha" port of the Render Layers node, corresponding to the "Shadow scene", containing the information on the transparency of the shadow, which we can adjust as before with the "Bright/Contrast" and SetAlpha nodes. We mix the shadow obtained with a color (red), represented by the RGB node (Add > Input > RGB) with color #FF0000, in a Mix node (Add > Color > Mix). At the entrance to the "Fac" door we insert the shadow whose intensity we first modified, in order to preserve the density of the shadow and to be able to vary it as we wish.

if we connect the output of the "Mix" node to the "Composite" node and start the rendering by pressing the F12 key, we obtain the desired colored shadow

Now let's color the shadowed part of the cube.
As before we perform the subtraction (Add > Converter > Math, with "Subtract" option) between "Alpha" and "Shadow" in order to calculate the area on which to act

We then modify the color and brightness of the shadowed part of the cube, using the "Color Balance" node (Add > Color > Color Balance); we modify the "Lift" property, the one that refers to dark tones or shadows, by setting the hexadecimal color #FF204A, obtaining

Now let's join the modified cube with its shadow, connecting the "Color Balance" node just seen with the "Mix" node, with which we had colored the shadow.

we start the rendering, by pressing the F12 key, and we obtain the desired effect (otherwise change as before from Composite to View Layer and vice versa to update)

Change the color of the shadows when rendering with the Light Path node:
To complete the discussion, let's now see how to change the color of the shadows even during rendering.
Cycles is a ray tracing rendering engine, in which the rays depart from the camera and after various interactions are broken down, containing various information.
We then use the "Light Path" node (Add > Input > Light Path) which helps us in the processing, giving us indications on which ray we are considering (coming from the camera, or containing information on the shadows, or on the diffuse, on the glossy etc.)

To change the color we are interested in the rays that contain information about the shadow (the return rays that encounter an object as an obstacle); with their help in the "is Shadow Ray" case we want the object not to be considered opaque, but as if the rays passed through an object of transparent colored material, to achieve this we replace the Principled shader with a Transparent (Add > Shader > Transparent BSDF), using the information of the "is Shadow Ray" port to filter the shaders in a "Mix Shader" node (Add > Shader > Mix Shader)

and, starting the rendering, we get
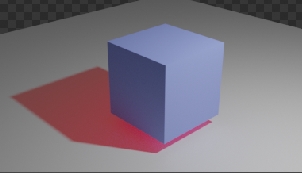
this solution however presents some problems with the Shadow Catcher, because the shadow loses its color.
For this tutorial, on how to modify intensity and color of a shadow with the Compositor, that's all, hoping it will help you in your photo insertions, to better blend the 3D objects in the scene. Happy blending!

